Using Gradle with Vaadin
I have long been using Ant for building my projects for Vaadin. I've grown accustomed to it and it has worked well. Maven really did never cut it for me, it was clunky to use and forces you to build your project like Maven wants it and not how you want it. So, I have been searching for alternative which would have the same features as Maven but not force me into the 'convention over configuration' hell which might be good for demos but is really useless for older or larger projects.
I found Gradle.
The first benefit of using Gradle is that you finally are able to get rid of those XML files. Gradle scripts are written in Groovy which means they are easier to understand and read. This was basically the the gripe I've long have had with my Ant scripts.
The second benefit is that I want to keep my projects source structure how I want it, the build system should never be the one to tell me how my project should look like, it should be the other way around. This is were Maven in my opinion fails badly.
Finally I want to have dependency management which supports any repo out there and Gradle supports both Ivy repositories as well as Maven repositories.
But lets take a look at how we can use Gradle to build a Vaadin application.
Building a Vaadin application with Gradle
My project for this example will be a project built with the Vaadin Plugin in Eclipse. So in eclipse create a project by selecting New->Other->Vaadin Project and name it for instance MyGradleProject. Here is a screenshot of the file structure after I created the project.
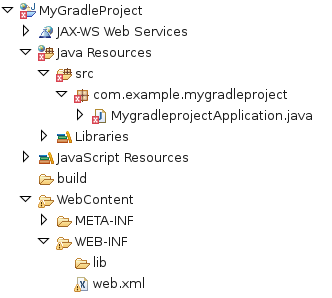
As you can see it is just the default project generated by the Vaadin Plugin. What I have done however is removed the Vaadin core jar from the project since we are going to let Gradle handle our dependencies. That is why the java file is showing an error indicator. We are going to rectify that soon.
Next, let us create our Gradle build script for the project. So In the root of the project create a file called build.gradle and open it up. Lets start by adding some project settings in the file.
apply plugin: 'war'
apply plugin: 'eclipse'
apply plugin: 'jetty'

// Project properties
version = "0.0.1"
sourceCompatibility = 1.6
targetCompatibility = 1.6
webAppDirName = 'WebContent'
The first thing I have done here is included three plugins, the war, eclipse and jetty plugins.
The war plugin will add some build targets for gradle which we will use to build our deployable war-archive with.
Since I am working with eclipse I've also included the eclipse plugin which will take care of updating the classpaths etc. for the project when the dependencies change. This plugin is totally optional but I find it handy when using eclipse.
Finally, I have included the jetty plugin to make it easy to launch the application. This is also totally optional if you want to use another application server.
Next, I have defined some project properties we are going to need to build the project. The version-property defines what version number the build artifact should have, the source- and target-compatibility is what Java version we are using and finally we have defined where the webapplication resource directory is located.
Next, lets take a look at dependency management. Lets add the following to our build.grails file:
// Repositories
repositories{
    mavenCentral()
}

// Dependencies
dependencies{
    compile group:'com.vaadin', name:'vaadin', version:'6.7.5'
}
As you probably could guess from the script we are going to use Maven Central -repository to fetch our dependencies from. In the dependencies section I have added the Vaadin library as the only dependency. When we have defined this then Gradle will download vaadin as well as any possible transitive dependencies when we build our war archive. It doesn't get much easier than this.
Next, lets setup our source folder.
// Setup source folders
sourceSets{
    main{
        java{
            srcDir 'src'
        }
    }
}
Why do I need to do this? The default folder where the WAR -plugin of Gradle assumes the source files are located in is main/webapp while the default Vaadin Project assumes they are located in src. With Maven we would need to change the directory structure to make it work but with Gradle it is the opposite, we just tell Gradle where to find the sources and it is happy. This is the kind of flexibility I have longed for when using Maven.
And that is it. Here is now the complete build script (build.gradle):
apply plugin: 'war'
apply plugin: 'eclipse'
apply plugin: 'jetty'

// Project properties
version = "0.0.1"
sourceCompatibility = 1.6
targetCompatibility = 1.6
webAppDirName = 'WebContent'

// Repositories
repositories{
    mavenCentral()
}

// Dependencies
dependencies{
    compile group:'com.vaadin', name:'vaadin', version:'6.7.5'
}

// Source directories
sourceSets{
    main{
        java{
            srcDir 'src'
        }
    }
}
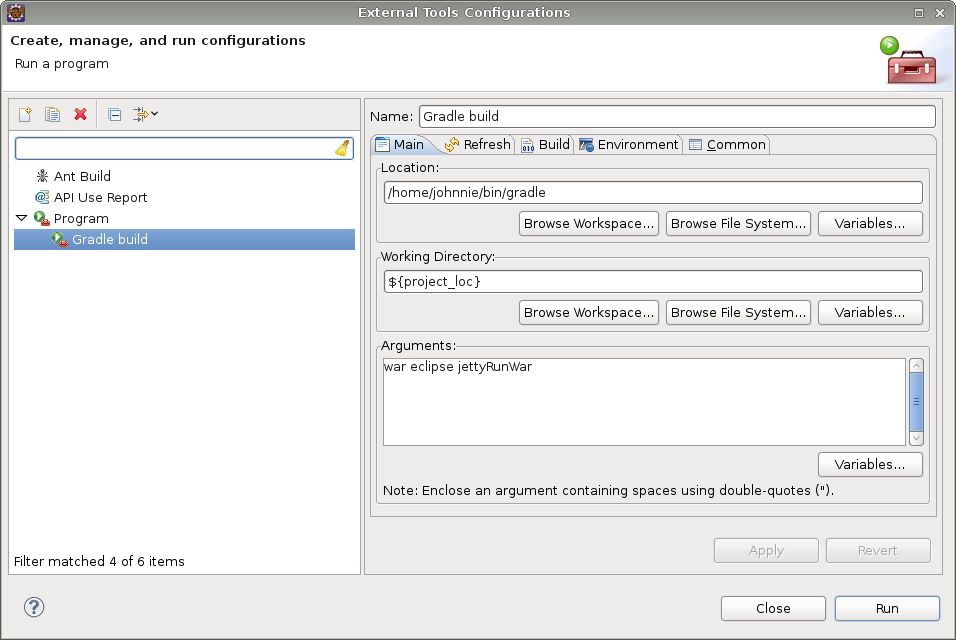
Now, lets configure a launch target in eclipse that will build and launch the vaadin application. In eclipse select Run->External Tools->External Tools Configurations. Lets add a new program called Gradle Build which builds the project and launches jetty to run the application. Here is how mine looks like:
Click Run and and you should get the following output in the console:
:compileJava
:processResources UP-TO-DATE
:classes
:war
:eclipseClasspath
:eclipseJdt
:eclipseProject
:eclipse
:jettyRunWar
This means no errors occurred when building the project and jetty is currently running. Point your browser at http://localhost:8080/MyGradleProject and you should see the running application.
Adding addons to the application
We now have a basic application running but in most cases we will want to add some addons to the application as well.
Addons with no client side implementation can just be added as dependencies to the project. No other changes are necessery to the build script, they will be included automatically in the built War-archive.
On the other hand if you are adding addons with a client side implementation then you will need to build the widgetset for the application. I am going to show you next how you can do it by adding the QRCode addon from the Vaadin directory to the project I created above.
So, lets get started! First, we will need to add the vaadin addon repository as well as the QRCode dependency to our build script. This is done by modifying the repositories and dependencies sections like this:
// Repositories
repositories{
    mavenCentral()
    mavenRepo url: 'http://maven.vaadin.com/vaadin-addons'
}

// Dependencies
dependencies{
    compile group:'com.vaadin',         name:'vaadin',   version:'6.7.5'
    compile group:'com.google.gwt',     name:'gwt-user', version:'2.3.0'
    compile group:'com.google.gwt',     name:'gwt-dev',  version:'2.3.0'
    compile group:'org.vaadin.addons',  name:'qrcode',   version:'1.2.0'
}
As you can see I've added the Maven Vaadin addon repository as well as some more dependencies. In addition to the QRCode addon dependency I have also added two GWT dependencies. We will need these to be able to compile the widgetset.
Now that we have all the dependencies we need lets replace the label in the application with a QRCode. So open up the MygradleprojectApplication.java file in the project and change it to look like this:
package com.example.mygradleproject;

import com.vaadin.Application;
import com.vaadin.ui.*;

import fi.jasoft.qrcode.QRCode;

public class MygradleprojectApplication extends Application {
    @Override
    public void init() {
        Window mainWindow = new Window("Mygradleproject Application");
        QRCode label = new QRCode("QR Code", "Hello happy developer!");
        mainWindow.addComponent(label);
        setMainWindow(mainWindow);
    }
}
We are done editing, save the file and close it.
Next, we will need to add a new widgetset to the application. Right click on the com.example.mygradleproject package and select New->Other->XML File. Name the file MygradleprojectApplicationWidgetset.gwt.xml
and add the following content to it:
<module>
    <inherits name="com.vaadin.terminal.gwt.DefaultWidgetSet" />
    <inherits name="fi.jasoft.qrcode.QrcodeWidgetset"/>
</module>
That is our widgetset. We will also need to tell Vaadin about this new widgetset, so open up the web.xml file an add a new init-param:
<init-param>
        <description>
        Application widgetset</description>
        <param-name>widgetset</param-name>
        <param-value>com.example.mygradleproject.MygradleprojectApplicationWidgetset</param-value>
</init-param>
Done. Now lets get back to our build script.
What we want to do is build the widgetset before we create the War-archive so we always have a up-to-date version of the widgetset.
To do that we first need to define some new project properties. Add the following where all the other project properties are defined:
vaadinDir = webAppDirName+'/VAADIN'
gwtBuildDir = vaadinDir+'/widgetsets'
widgetsetClass = 'com.example.mygradleproject.MygradleprojectApplicationWidgetset'
Now we need to create a new task which actually builds the widgetset. This is done by adding the following task to the build script:
// Widgetset compilation
task widgetset << {
        // Create widgetset directory (if needed)
        created = (new File(gwtBuildDir)).mkdirs()

        // Compile
        ant.java(classname:'com.google.gwt.dev.Compiler', failOnError: 'yes', fork: 'true', maxmemory: '512m')
        {
                classpath {
                        pathElement(path: configurations.compile.asPath)
                        pathElement(path: sourceSets.main.runtimeClasspath.asPath)
                        sourceSets.main.java.srcDirs.each{
                                pathelement(location:it.absolutePath)
                        }
                }

                arg(line: '-war ' + gwtBuildDir)
                arg(line: '-logLevel INFO')
                arg(line: '-style OBF')
                arg(line: '-localWorkers 2')
                arg(line: widgetsetClass)

                jvmarg(value: '-Djava.awt.headless=true')
                jvmarg(value: '-XX:MaxPermSize=256M')
                jvmarg(value: '-Xmx184M')
        }
}
This task we do the widgetset compilation for us.
Now what remains is to tell gradle that we want to compile the widgetset before the War-archive is built. This can be done by adding the following after the widgetset task:
// Require widgetset compilation before WAR is built
war.dependsOn widgetset
And we are done. Here is now the complete build script (build.gradle) with widgetset compilation included:
apply plugin: 'war'
apply plugin: 'eclipse'
apply plugin: 'jetty'

// Project properties
version = "0.0.1"
sourceCompatibility = 1.6
targetCompatibility = 1.6
webAppDirName = 'WebContent'
vaadinDir = webAppDirName+'/VAADIN'
gwtBuildDir = vaadinDir+'/widgetsets'
widgetsetClass = 'com.example.mygradleproject.MygradleprojectApplicationWidgetset'

// Repositories
repositories{
    mavenCentral()
    mavenRepo url: 'http://maven.vaadin.com/vaadin-addons'
}

// Dependencies
dependencies{
    compile group:'com.vaadin',         name:'vaadin',      version:'6.7.5'
    compile group:'com.google.gwt',     name:'gwt-user',    version:'2.3.0'
    compile group:'com.google.gwt',     name:'gwt-dev',     version:'2.3.0'
    compile group:'org.vaadin.addons',  name:'qrcode',      version:'1.2.0'
}

// Source directories
sourceSets{
    main{
        java{
            srcDir 'src'
        }
    }
}

// Widgetset compilation
task widgetset << {
        // Create widgetset directory (if needed)
        created = (new File(gwtBuildDir)).mkdirs()

        // Compile
        ant.java(classname:'com.google.gwt.dev.Compiler', failOnError: 'yes', fork: 'true', maxmemory: '512m')
        {
                classpath {
                        pathElement(path: configurations.compile.asPath)
                        pathElement(path: sourceSets.main.runtimeClasspath.asPath)
                        sourceSets.main.java.srcDirs.each{
                                pathelement(location:it.absolutePath)
                        }
                }

                arg(line: '-war ' + gwtBuildDir)
                arg(line: '-logLevel INFO')
                arg(line: '-style OBF')
                arg(line: '-localWorkers 2')
                arg(line: widgetsetClass)

                jvmarg(value: '-Djava.awt.headless=true')
                jvmarg(value: '-XX:MaxPermSize=256M')
                jvmarg(value: '-Xmx184M')
        }
}

// Require widgetset compilation before WAR is built
war.dependsOn widgetset
Now, run the previously created Gradle launch configuration and the widgetset should be built and deployed to jetty. Point your browser over to http://localhost:8080/MyGradleProject to verify that the QRCode is visible.
You have now configured a fully working gradle build script, Congratulations!