Dockerizing Java services with Gradle and Jib
Long gone are the days where we deployed our Java services into monolith Java application servers. In this tutorial I will show you how to deploy your Java (or any other JVM based) service or application as a Docker container to the cloud.
In this tutorial we will do the following:
- Building a docker image with Gradle using Google Jib
- Setting up a private docker registry on Docker Hub
- Publishing a docker image to Docker Hub
Building docker images with Gradle and Jib
Let's start with assuming you already have a Java based project that has a main class that will run your project. This can be a web application with an embedded server (Spring Boot, Ratpack, Micronaut,...), a Swing based desktop application or a terminal based application.
We are going to assume you are currently building the project with Gradle as that is the most sensible thing to do today.
Now, how are you going to package your application into a docker image and publish it?
The first thing that comes to mind is to manually add a Dockerfile to your directory and then run "docker build ." from a Gradle task.
Something like this:
task buildDockerImage(Exec) {
    command = "docker"
    args = "build -t my-image-0.1 ."
}
Well that was simple?!
Well not exactly. While this might work in the most simplest of cases it is far from the best we can do with Gradle.
The first thing you will notice is that you will need to first build the JAR to include in the docker image. So we need to add something like dependsOn jar to the task.
Then you'll notice that if the application has any dependencies then they won't be included. So you will need to
- Create a new task that assembles all dependency artifacts into a directory
- Include the generated directory into the image by referencing it via the Dockerfile and add the correct library deference to the ENTRYPOINT layer.
By now you probably have written around 50 lines of code in your build.gradle already. But hey, you might have it working!
So now you make one change in your source code and build again. And the whole docker container re-builds leaving you waiting for 5 minutes for every time you make a change...
:(
But as devops engineers we know that this can quickly be solved with layering our Dockerfile!
We can do that by making sure that our Jar file is added last in our Docker file so only the last layer changes. So we do that and add plenty of comments into our Dockerfile so everybody knows that they shouldn't go change the order in the Dockerfile.
But wait, you want to set the JVM parameters for the application dynamically so you can build for different environments and ensure the application does not take up too much memory.
But the JVM parameters are hard-coded in the ENTRYPOINT layer in the Dockerfile!
Hmm...
Right, so what we want to do is dynamically generate the Dockerfile so we can generate different files based on environment variables so we add a new task to our Gradle build that generates the Dockerfile, we then make our build task depend on that and use the Dockerfile as input.
Our Dockerfile is now 100 lines long, full of comments and inlined in the build.gradle file. Our work is done !?
We'll no, but lets stop here even if we are not done. You hopefully get the picture.
There is a better way.
Google Jib was made for this exact purpose. It will do all those things we did above (and much more) without you filling your Gradle build with error prone logic that (most likely if your are new to Gradle) will not work as you want anyway.
Lets have a look into how we would use Jib for that same use-case.
plugins {
   id "com.google.cloud.tools.jib" version "2.4.0"
}

version = 0.1
group = my.company

jib {
    from {
        image = "openjdk:14-slim"
    }
    to {
        image = "my-registry.some-provider.com/my-app"
        tags = [version, 'latest']
    }
    container {
        mainClass = "${group}.Application"
        jvmFlags = ["-Xms${findProperty('MEMORY')?:'256'}m", '-Xdebug']
        ports = ['80']
        volumes = ['/data']
        environment = [
            'VERSION': version
            'DATA_DIR': '/data',
            'APPLICATION_PORT' : '80',
            'DEVELOPMENT_MODE' : 'false'
        ]
    }
}
Lets go through that line-by-line:
Lines 1-3: Import the plugin from the Gradle plugin portal
Line 8: Jibs main configuration block
Lines 9-11: The source image to build from. We are building Java apps so we use a java image.
Lines 12-15: The target image we want to generate. We will come back to this when we talk about deployment.
Lines 16-27: The container definition defining how our Dockerfile will look like.
What this will do is the same as we tried to do ourselves; it will layer the docker container so that the minimal amounts of layers need to be re-created when doing changes, it will ensure all our dependencies (and transitive dependencies) are packaged into the image and it will ensure our application is executed with the corrent parameters and environment.
And best of all, all configuration is in Gradle so we can pass Gradle parameters to it. Right, lets test this out.
So to build an image we will execute the following task:
$ gradle jibDockerBuild
This will build the docker image for you locally on your machine. This allows us to test it out before we push it out into production.
The first time you build it will take a while as docker will need to pull in the base image as well as create all your application layers. Once that is done, rebuilding the application is usually a matter of seconds.
Once we have built our image successfully we can run the application by doing
$ docker run \
    -p 5555:80 \
    -v /home/john/mydata/:/data \
    my-registry.some-provider.com/my-app:latest
So now we can develop and test the application while we continue development. Next we will take a look at how we can push our image to production by setting up a docker registry and pushing our image there.
Setting up a private docker registry on Docker Hub
One of the key things you will need when working with Docker in production is your own docker registry. There are two variants of those; a private registry or a public registry.
For Open Source projects a public registry is usually enough. Just be aware that when using a public registry always ensure you are not adding any database credentials or other secrets to either the application or the container as anyone can access those who has access to the registry.
Usually though we will have credentials or other secrets so we want to opt for a private repository.
There are multiple ways you can set up your own private docker registry. There are both free and paid for options you can use, but since we are starting out I'll look at some free and easy ways of getting started.
The first free option is to manually install the docker registry onto your production server. You will need to set up authentication yourself and ensure that the server runs on HTTPS. If you are beginner with Docker I don't recommend this as it takes some knowledge how to correctly manage a docker registry.
Another option if you are working on Gitlab you can get a free private registry by using a Gitlab repository. Have a look at https://docs.gitlab.com/ee/user/packages/container_registry/ to set the registry up.
In this article though we are going with the grand-father of docker registries, Docker Hub.
Docker Hub offers one private repository for free while unlimited repositories will cost you $5/month. If you only have one docker application then this is perfect, and even if you have many, $5/month is not too bad.
To get started head over to https://hub.docker.com/ and sign up.
Once you are done you should see the Dashboard like this:
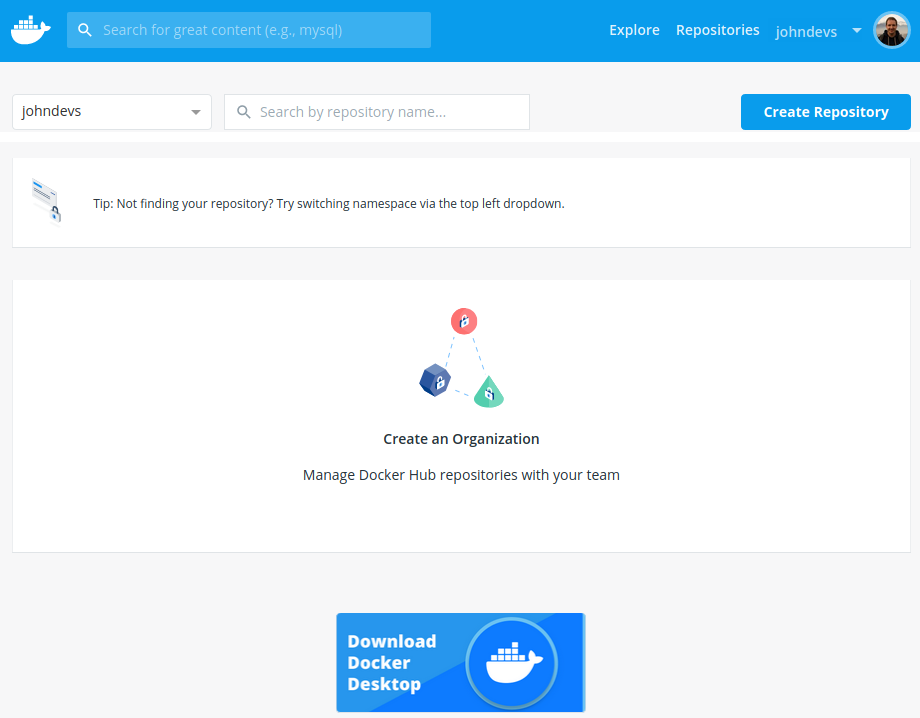
The Dasboard is still empty as we haven't yet created any containers. Lets fix that!
Create a new private repository for our application by clicking on the Create Repository button and you'll see this screen:

Just fill in the application name and a suitable description and the most important thing, select Private as the repository type.
Select Create and the repository will be created for you.
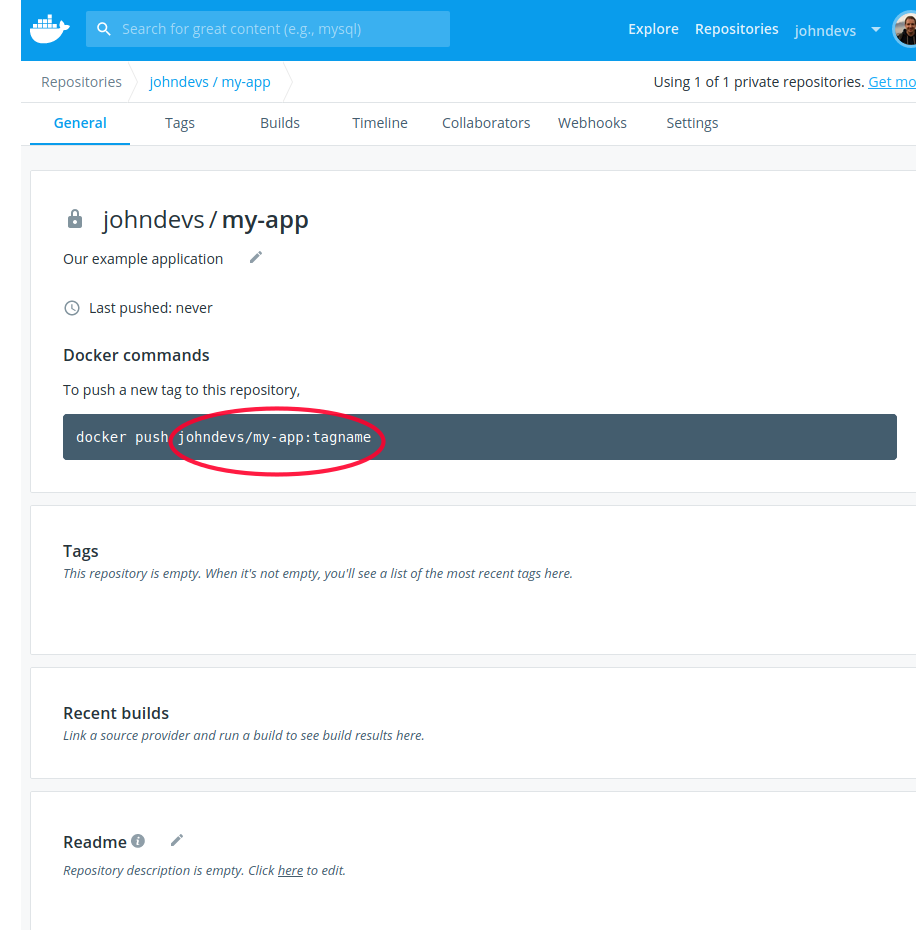
Once the repository is created a unique repository path is created for your repository (highlighted in red above). Copy this path somewhere as we will need it.
Now that we have our docker registry set up we need to make some modifications to our build configuration's to {} closure to take those into account.
....
jib {
...
    to {
        image = johndevs/my-app"
        tags = [version, 'latest']
        auth {
           username = findProperty('DOCKERHUB_USERNAME')
           password = findProperty('DOCKERHUB_PASSWORD')
        }
    }
...
}
First we set the image to match the registry path we got from Docker Hub above. Jib will by default assume that we are using Docker Hub if we haven't specified a explicit registry, for other registries it would look like this (image = registry.some.provider.com/johndevs/my-app).
Next, we need to provide the credentials for accessing the registry. We can do that in two ways;
We either do what we have done here, that is, we provide the credentials directly via the auth{} closure by using environment variables from the build environment.
Or the other option is to set the auth.credHelper property which will use the GIT credential helper to fetch the credentials. As that is a bit more involved to set up I have omitted that approach here.
We are now ready to push our image to production.
Publishing a docker image to Docker Hub
To push our image to production we use a different Gradle task than before when we were developing locally. We run the following:
$ gradle jib -PDOCKERHUB_USERNAME=***** -PDOCKERHUB_PASSWORD=********We run the jib-task and provide the Docker Hub user-name and Password as properties to the build. Gradle will as before assemble the image and then if you gave the correct credentials it will push the image to Docker Hub.
You can verify that the image was successfully pushed by checking the dashboard:
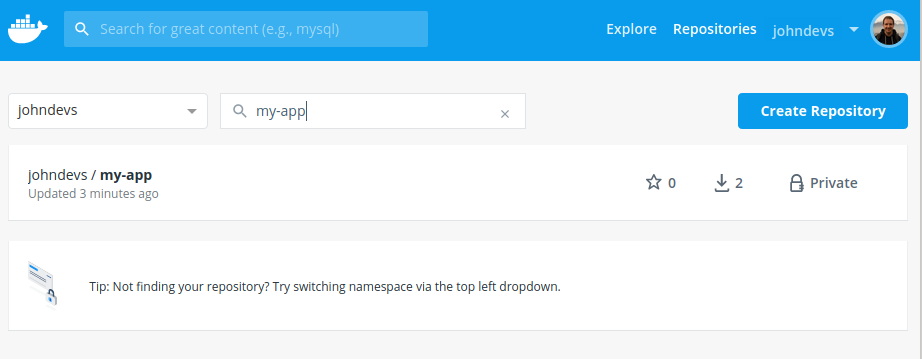
You'll see that our application just got updated.
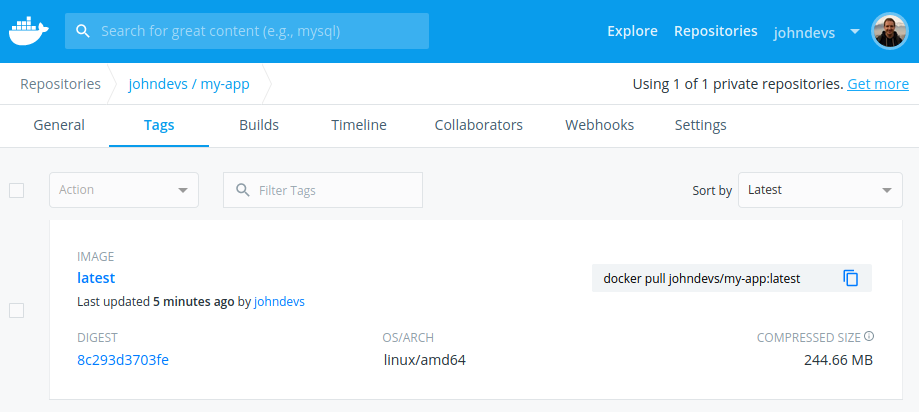
Further if you open up the settings of that application you can see more details of the application.
Lets finally try to use the image from Docker Hub.
This is done exactly the same way as we did locally except that we need to first log in to Docker Hub before pulling the image.
$ docker login
Login with your Docker ID to push and pull images from Docker Hub. If you don't have a Docker ID, head over to https://hub.docker.com to create one.
Username: *******
Password: *******
WARNING! Your password will be stored unencrypted in /home/john/.docker/config.json.
Configure a credential helper to remove this warning. See
https://docs.docker.com/engine/reference/commandline/login/#credentials-store

Login Succeeded
As you could see we could also again use the credential helper to help us out with the login.
Once we are successfully logged in we can just run the application with
$ docker run \
    -p 5555:80 \
    -v /home/john/mydata/:/data \
    johndevs/my-app:latest
This time, Docker will first pull the image (with all its layers) from Docker Hub (instead of your local machine) and then run that container. This is essentially what you would set up in production as well.
So now you can package any Java application into a Docker container and distribute it via Docker to your users. Once you have done it once it will be trivial to push updates to your container and update your application in the future.