Test coverage analysis with Emma
Using code coverage can be a useful tool in TDD to see how much of the code we have tested. But one should remember that it is all it measures, it does not tell you whether your code is tested enough or if the tests are good tests. Having 100% of code coverage is a good thing, but it is just a first step in your testing strategy.
I'm now going to show you how you can use Emma in your Java projects in Eclipse and then how we can then combine it with Jenkins to be able to instantly see the reports after each build.
Test coverage with Emma in Eclipse
To be able to use Emma in Eclipse we will need to install the Emma plugin, so open up your Eclipse Workspace and select Help -> Eclipse Marketplace. Type in "Emma" in the search field and it should look like this.
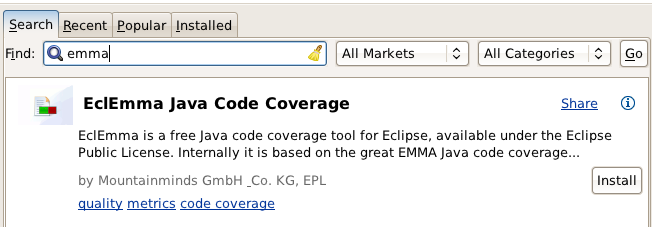
Select the Install button and answer the few questions Eclipse asks and the plugin should get nicely installed.
Now that we have Emma installed lets create a Java project and try it out.

Above I have created a new Java project and added two classes, an object with one method to test and an empty JUnit test for it. Lets run Emma and see what happens.
To run the Emma code coverage analyzer right click on the JUnit test and select Coverage as -> JUnit Test as I have done below. You can also run all tests in the project by right clicking on the project itself and select Coverage as JUnit test.
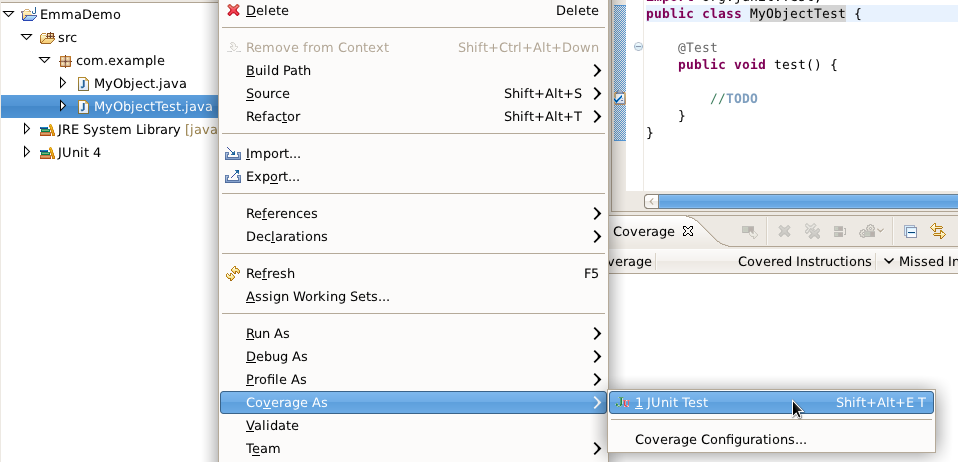
After you select the Coverage as JUnit test Emma will run the unit test and generate a Coverage report of the tested objects. Here is how it will look like:
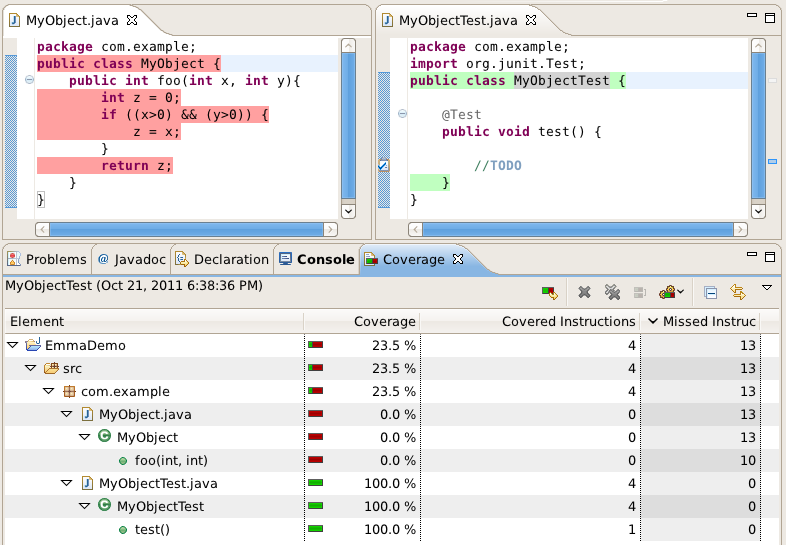
Since our test is empty and we are not using MyObject nor calling any of its methods then we can see that we have 0.0% coverage. Lets see what happens when we start using MyObject in our test. Lets implement a real test and run Emma once more. Here are the results.
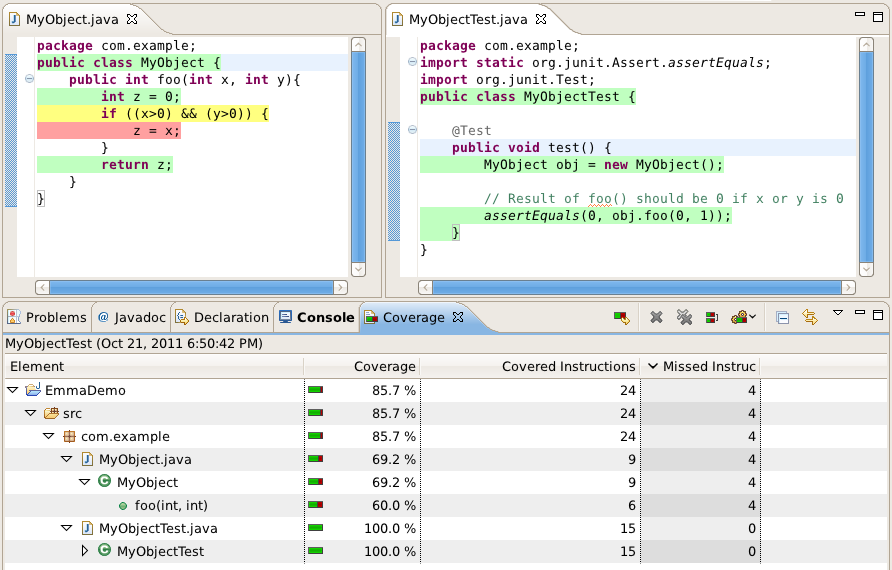
I wrote a test that tests the result of MyObject.foo with x=0 and y=1. We can now see that MyObject has a test code coverage of 69.2%. What has changed?
We can see that the class definition of MyObject has turned green. This is because we are using an instance of MyObject in our test.
Since we are calling the method foo() in our test we can see that some of the statements in it has turned green. This is because they got executed while running the method.
We can also see that the if-statement has turned yellow. This means that we have only partially tested that statement and would need some more asserts with different x and y values to test it fully.
Finally, we can see that one line remains red. This simply means we never get to that line when executing foo() with x=0 and y=1. If we had given positive values for both arguments then we would have tested that line as well and it would be green.
Okay, that concludes the basics of analyzing the test coverage using the Emma eclipse plugin. Now lets go onto how we could integrate Emma with our CI server, in my case with Jenkins.
Automating Emma report generation with Jenkins
Lets take the next step and automate the process on our CI server.
The first, and easiest, step would be to add Emma support to Jenkins. Fortunately adding adding Emma support is pretty straight forward. Just open up Jenkins in your browser, select Manage Jenkins, then from that view Manage Plugins. From the plugins view select the available-tab and scroll down to the Emma Plugin and install it. Now our Jenkins installation supports generating Emma reports.
To use Emma with Jenkins we are going to create an Ant test script which Jenkins can run. First you should add some needed dependencies.
You will obviously need JUnit to run our tests and you will also need the Emma dependency jars. They can be found at http://emma.sourceforge.net/downloads.html. My project structure now looks like this.
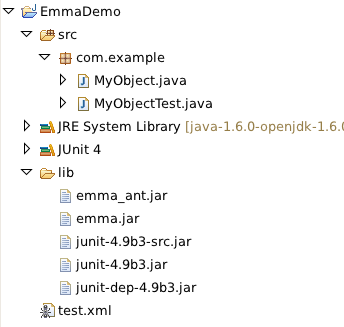
You can see that there is a test.xml located in my project as well. I will use this in Jenkins to run the JUnit test and generate the coverage reports.
Here is how test.xml looks like:
<project name="timepack-tests" default="all" basedir=".">
    <!-- Test related properties -->
    <property name="src" value="src" />
    <property name="lib" value="lib" />
    <property name="classes" value="bin" />

    <!-- Target directory for instrumentation files -->
    <property name="emma.instr.dir" value="build/tests/instrumentation" />

    <!-- Target directory for coverage files -->
    <property name="emma.coverage.dir" value="build/tests/coverage" />

    <!-- Classpath for JUnit tests -->
    <path id="test.classpath">
        <pathelement path="${src}" />
        <pathelement path="${test.dir}" />
        <pathelement path="${demo}" />
        <pathelement path="${emma.instr.dir}" />
        <pathelement path="${test.classes}" />
        <fileset dir="${lib}">
            <include name="**/*.jar" />
        </fileset>
    </path>

    <taskdef resource="emma_ant.properties" classpathref="test.classpath" />

    <!-- Cleans up compilation output  -->
    <target name="clean-compile-test">
        <delete dir="${test.classes}" />
        <delete dir="${emma.instr.dir}" />
        <delete dir="${emma.coverage.dir}" />
    </target>

    <!-- Compiles java source code -->
    <target name="compile-test" depends="clean-compile-test">
        <mkdir dir="${classes}" />
        <javac srcdir="${src}" destdir="${classes}">
            <classpath refid="test.classpath" />
        </javac>
    </target>

    <!-- Analyzes the compiled code and adds instrumentation details for testing -->
    <target name="emma-instrument" depends="compile-test">
        <mkdir dir="${emma.instr.dir}" />
        <mkdir dir="${emma.coverage.dir}" />
        <emma enabled="true">
            <instr instrpath="${classes}" destdir="${emma.instr.dir}"
                metadatafile="${emma.coverage.dir}/coverage.emma" merge="true" />
        </emma>
    </target>

    <!-- Runs the tests and generates coverage information  -->
    <target name="test-instrumented" depends="emma-instrument">
        <junit fork="yes" printsummary="yes" haltonfailure="no">
            <classpath refid="test.classpath" />
            <formatter type="plain" usefile="false" />
            <batchtest>
                <fileset dir="${classes}" includes="**/*Test.class" />
            </batchtest>
            <jvmarg value="-Demma.coverage.out.file=${emma.coverage.dir}/coverage.emma" />
            <jvmarg value="-Demma.coverage.out.merge=true" />
        </junit>
    </target>

    <!-- Create XML reports from the coverage information -->
    <target name="emma-report" depends="test-instrumented">
        <emma enabled="true">
            <report sourcepath="${src}">
                <fileset dir="${emma.coverage.dir}">
                    <include name="*.emma" />
                </fileset>
                <xml outfile="${emma.coverage.dir}/coverage.xml" />
            </report>
        </emma>
    </target>

    <!-- Default target -->
    <target name="all" depends="emma-report" />

    <!-- Cleanup -->
    <target name="clean" depends="clean-compile-test" />
</project>
Basically generating an Emma report requires the following steps (which has been done in the test script):
- Compile the java sources to class files (compile-test)
- Instrument (a.k.a adding coverage information) the compiled classes with Emma (emma-instrument)
- Generate coverage information by running the instrumented JUnit classes (test-instrumented)
- Convert the generated coverage information into XML reports (emma-report)
More information about the instrumentation process can be found over at http://emma.sourceforge.net
The next and final step to bring everything together would be to configure our Jenkins project.
I am assuming you know how to export and create a project in Jenkins, if you don't then instructions can be found online or if you are using git as your VCS then check out my previous blog post Continuous-Integration-with-Gitosis-and-Jenkins
Now that you have your project in Jenkins lets take a look at how we can generate those reports. Open up the project in Jenkins and select Configure. Scroll down to the bottom of the page and you should see a checkbox labeled Record Emma coverage report. If you don't see it then you will need to install the Emma plugin into Jenkins. When you check the box you will get the options below:

The important option here is the folders and files which should be included in the coverage report. My test.xml file generates the reports in the above XML file so you should add it if you are using that script.
Before we save the changed Jenkins project configuration we need to add a build step where test.xml is called so our coverage reports get generated. So, in the build section add a new Ant build step and call the all target in our test.xml like I've done below.
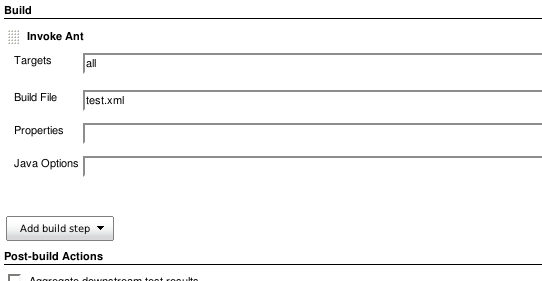
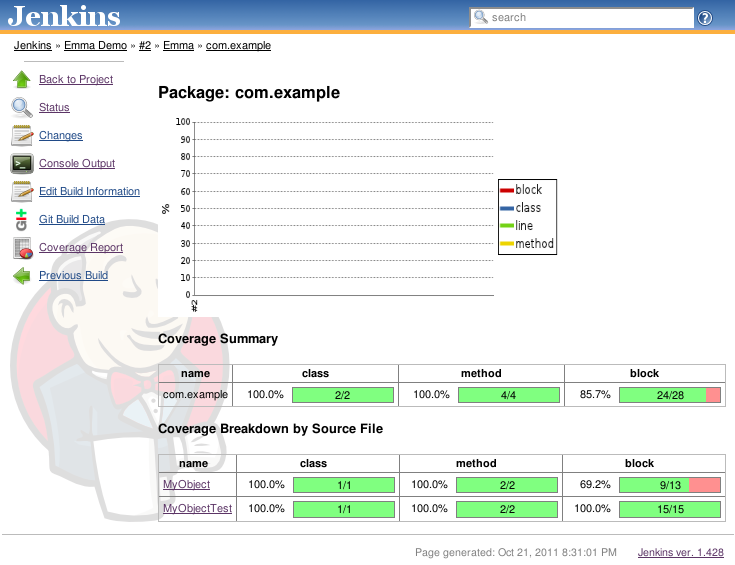
Now we are done! Save the project settings and run a build, hopefully everything goes well and you get your Emma reports nicely generated by Jenkins. Here is how it will look when you get it properly setup.
