TodoMVC: Fullstack serverless applications (Part 2: The REST API)
In this article lets explore how we can build a REST API using FN functions. This is the second part of our TodoMVC app we started building in the previous post. A demo running this project can be found here.
To build our back-end we are going to do two things; set up the REST API end-points and connect them to DynamoDB where we are going to store our todo items.
The API
The API we are going to create is a simple CRUD (Create-Read-Update-Delete) API for the Todo items.
There are multiple ways we could split this functionality up to FN functions.
- Handle all REST methods in one function
- Create one function for each REST method
- Create one function for read operations (GET) and one for write operations (PUT,POST,PATCH,DELETE)
Which approach you select depends on your use-case.
If we would have a lot of business logic then 2. might have been a better option as we could have split out our code based on operation. However, if we had done that then we wouldn't have been able to use pure REST as every function needs a unique path and with REST for example GET and POST might have the same path.
The third (3.) option might be interesting if we would anticipate that our application would have a lot of read requests but not that many write requests. By splitting it in this way we could load balance the read operations in a different way than write operations and maybe for read operations add more FN servers to provide a better throughput. With this approach you have the same downside as with 2. i.e. you will not be able to write a pure REST API.
We are going to select 1. as our business logic is really small and it allows us to use a single URL path for all operations we need for our TodoMVC app. We also don't anticipate a lot of requests so we don't have to care about load balancing.
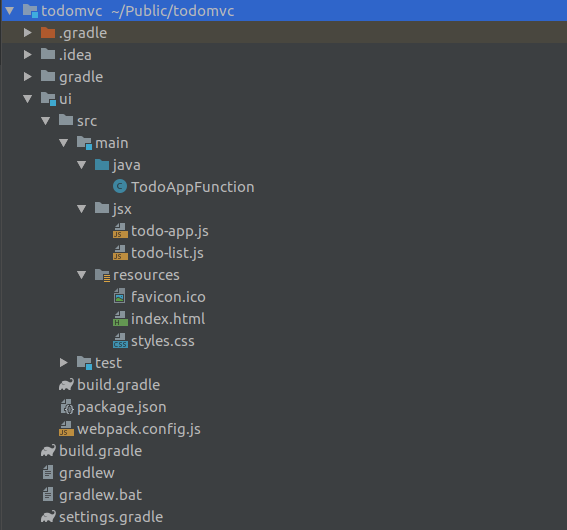
Before we continue, lets recap how our project structure currently looks like after we added the UI logic in the previous post.
So to add the API we start by creating a new submodule in the existing project for our back-end functionality.
Next we will need to turn the module into a FN function to serve our REST API.
We start by removing any auto-generated src folder Intellij might have created for us. Then, open up the api/build.gradle file and add the following content:
/*
 * We use ReplaceTokens to replace property file placeholders
 */
import org.apache.tools.ant.filters.ReplaceTokens

/*
 * Main FN function configuration
 */
fn {
    functionClass = 'TodoAPI'
    functionMethod = 'handleRequest'
    functionPaths = ['/items']
}

/**
 * Configure FN Function timeouts
 */
fnDocker {
    idleTimeout = 30
    functionTimeout = 60
}

dependencies {
    compile 'com.amazonaws:aws-java-sdk-dynamodb:1.11.490'
    compile 'org.slf4j:slf4j-simple:1.7.25'
}

/**
 * Replaces the AWS credential placeholders with real credentials
 */
processResources {
    from(sourceSets.main.resources.srcDirs){
        filesMatching('aws-credentials.properties'){
            filter(ReplaceTokens, tokens: [
                'aws.accessKeyId' : System.getenv('AWS_ACCESS_KEY_ID') ?: project.findProperty('aws.accessKeyId') ?: '',
                'aws.secretKey' : System.getenv('AWS_SECRET_ACCESS_KEY') ?: project.findProperty('aws.secretKey') ?: '',
                'aws.region' : System.getenv('AWS_REGION') ?: project.findProperty('aws.region') ?: ''
            ])
        }
    }
}
Finally, we just invoke the :api:fnCreateProject task to create the function source stubs based on the previously created build configuration.
Now our project structure looks like this
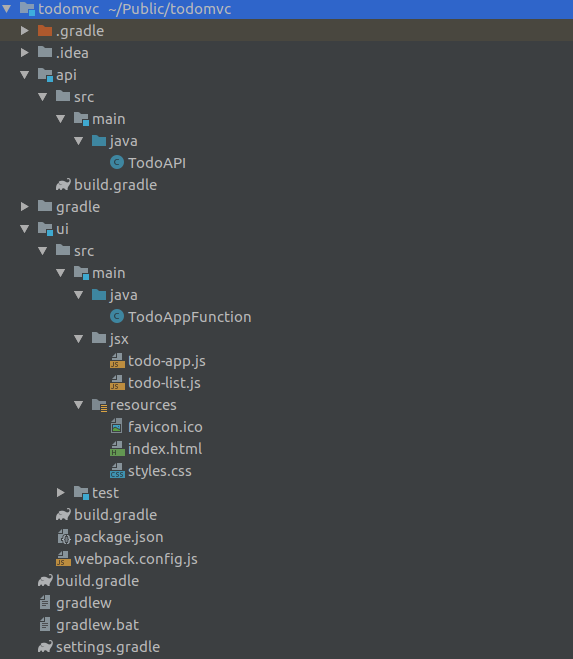
We are now ready to implement the TodoAPI.
Persistence with AWS DynamoDB
Now that we have our function ready, lets implement the persistence layer.
The first thing we will need is to model how the Todo items should look like in AWS DynamoDB. We can do that by creating a model class (TodoItem.java) that specifies how a single item is modeled:
@DynamoDBTable(tableName = "todomvc")
public class TodoItem implements Serializable {

    private String id = UUID.randomUUID().toString();
    private boolean active = true;
    private String description;

    @DynamoDBHashKey
    public String getId() { return id; }
    public void setId(String id) { this.id = id; }

    @DynamoDBAttribute
    public boolean isActive() { return active; }
    public void setActive(boolean active) { this.active = active; }

    @DynamoDBAttribute
    public String getDescription() { return description; }
    public void setDescription(String description) { this.description = description;}

    /**
     * Helper method to create a TodoItem from an InputStream
     */
    public static Optional<TodoItem> fromStream(InputStream stream) {
        try {
            return Optional.of(new ObjectMapper().readValue(stream, TodoItem.class));
        } catch (IOException e) {
            return Optional.empty();
        }
    }

    /**
     * Helper method to convert the items into a byte array
     */
    public Optional<byte[]> toBytes() {
        try {
            return Optional.of(new ObjectMapper().writeValueAsBytes(this));
        } catch (JsonProcessingException e) {
            return Optional.empty();
        }
    }
This is pretty much a standard POJO with some DynamoDB specific annotations to help serialize the object. Our model is pretty simple, every item will only need to have two fields to keep track of; description and active.
The id field is only there to help us uniquely identify an item so we can modify or remove it. We could just as well have used the description field as our DynamoDB key, but that would have implied that we wouldn't be able to store duplicate items in our todo list.
Now that we have our item model, let's get back to the API implementation.
For our todomvc application we will need to support the following actions:
- Get a list of existing items (GET)
- Save a new item to the list (POST)
- Update an exist item to the list (PUT)
- Delete an item from the list (DELETE)
To do that we are going to modify our function in TodoAPI.java a bit to handle all those cases with a switch-statement:
public OutputEvent handleRequest(HTTPGatewayContext context, InputEvent input) throws JsonProcessingException {
    switch (context.getMethod()) {
        case "GET": {
            return fromBytes(new ObjectMapper().writeValueAsBytes(getItems()), Success, JSON_CONTENT_TYPE);
        }
        case "POST": {
            return input.consumeBody(TodoItem::fromStream)
                    .map(this::addItem)
                    .flatMap(TodoItem::toBytes)
                    .map(bytes -> fromBytes(bytes, Success, JSON_CONTENT_TYPE))
                    .orElse(emptyResult(FunctionError));
        }
        case "PUT": {
            return input.consumeBody(TodoItem::fromStream)
                    .map(this::updateItem)
                    .flatMap(TodoItem::toBytes)
                    .map(bytes -> fromBytes(bytes, Success, JSON_CONTENT_TYPE))
                    .orElse(emptyResult(FunctionError));
        }
        case "DELETE": {
            return input.consumeBody(TodoItem::fromStream)
                    .map(this::deleteItem)
                    .flatMap(TodoItem::toBytes)
                    .map(bytes -> fromBytes(bytes, Success, JSON_CONTENT_TYPE))
                    .orElse(emptyResult(FunctionError));
        }
        default:
            return emptyResult(FunctionError);
    }
}
As you can see we start by modifying our function to inject the HTTPGatewayContext as well as the InputEvent so we can process the request. From the context we get the HTTP method used to call the function and from the input event we get the HTTP request body.
Next, depending on which HTTP method was used, we convert the HTTP body into our TodoItem model and save it to the database.
To help us understand how this gets saved to the database, lets look at the rest of TodoAPI.java:
public class TodoAPI {

    private static final String JSON_CONTENT_TYPE = "application/json";

    private final DynamoDBMapper dbMapper;

    public TodoAPI() {
        var awsProperties = getAWSProperties();
        var awsCredentials = new BasicAWSCredentials(
                awsProperties.getProperty("aws.accessKeyId"),
                awsProperties.getProperty("aws.secretKey"));
        var awsClient = AmazonDynamoDBClient.builder()
                .withRegion(awsProperties.getProperty("aws.region"))
                .withCredentials(new AWSStaticCredentialsProvider(awsCredentials))
                .build();

        dbMapper = new DynamoDBMapper(awsClient);
    }

    public OutputEvent handleRequest(HTTPGatewayContext context, InputEvent input) throws JsonProcessingException {
    // Implementation omitted
    }

    private List<TodoItem> getItems() {
        return new ArrayList<>(dbMapper.scan(TodoItem.class, new DynamoDBScanExpression()));
    }

    private TodoItem updateItem(TodoItem item) {
        dbMapper.save(item);
        return item;
    }

    private TodoItem addItem(TodoItem item) {
        dbMapper.save(item);
        return item;
    }

    private TodoItem deleteItem(TodoItem item) {
        dbMapper.delete(item);
        return item;
    }

    private static Properties getAWSProperties() {
        var awsProperties = new Properties();
        try {
           awsProperties.load(TodoAPI.class.getResourceAsStream("/aws-credentials.properties"));
        } catch (IOException e) {
            throw new RuntimeException("Failed to load AWS credentials!", e);
        }
        return awsProperties;
    }
}
As you probably noticed, we set up a DynamoDBMapper using the credentials we have stored in a file called aws-credentials.properties under our project resources.
If you check out the api/build.gradle file you will notice that we are populating the real credentials into the aws-credentials.properties file at build time.
Once we have the DynamoDBMapper it is a trivial task to query DynamoDB for items as well as add, update and remove items. The mapper will handle all communication for us.
Wrapping up
This is pretty much all there is to create a REST API using a FN Function.
We can now run the project as we did in the first part.
The difference will now be that both the UI and the API functions will be deployed to the FN server. If you want to try out the REST API it will be available under http://localhost:8080/t/todomvc/items .
The sources for the full example which you can check out and directly run is available in here. You will need valid AWS credentials to try out the example as well as create a new DynamoDB instance to host your data.