TodoMVC: Fullstack serverless applications (Part 1: The UI)
In this two part blog series we are going to look at how we can serve a full web application by only using FN Project Java serverless functions. We are going to do this by writing a classic TodoMvc application all the way from the UI with React to the persistence leveraging Amazon DynamoDB. In this first part we are going to focus on building the front-end while in the second part we finish the application by creating an API for the UI.
Why serverless?
When thinking of "serverless" or FAAS (Function-As-A-Service) you might think that the primary benefit is its simplicity, you don't have to care about running an application server and can focus on writing application code. While that is partly true, I think there are even more, more substantial benefits that can be considered.
Stateless
All serverless functions are stateless by design. Trying to save a state in a function simply will not work since after the function is executed the application is terminated and along with it all the memory it consumed. This means a lot less worries about memory leaks or data leaks and allows even junior developers to write safe applications.
Scalable
Serverless as a paradigm is similar to what micro-services provide. A way of cleanly separating functionality into smaller units or Bounded Contexts as Martin Fowler so famously put it. Serverless functions allows you to do the same as micro-services, group functions into serverless applications (like the one I will be showing) with the benefits of writing less boiler-plate code than traditional micro-service frameworks.
Cost effective
A common way to host your applications is to purchase a VPC from a vendor like Digital Ocean, or set up an Amazon EC2 instance and what you pay for is ultimately how much memory and CPU you are using. A common micro-service approach then is to deploy the application on an embedded application server like Jetty or Tomcat and then further wrap that inside a Docker container. The downside of this is that once that is deployed it will actively consume resources even while nobody is using your application and every micro-service will actually contain a fully fledged application server. In contrast, serverless functions only consume resources while they are active which means that you actually only pay for what you need. You can even further optimize on a function-basis if you've split your application wisely into functions so that the most used functionality of your application gets higher priority (and resources) while the less used gets less.
Of course, using serverless functions is not a silver bullet and comes with some considerations.
If you have a high-volume application it might be wise to split your application into a few micro-services that take the most load as they are always active and then implement serverless functions around those services for the less used functionality. It is also worth noting that serverless functions comes with a ramp-up time, i.e if the function is not hot (it hasn't been invoked in a while), it will take a few more milliseconds for it to start as the docker container wakes up from hibernation and cause a slight delay. You can affect this by tweaking the function but more about that later.
Creating our TodoMVC project
For those impatient ones who just want to browse the code, the full source code for this example can be found here https://github.com/devsoap/examples/todomvc-fn-java.
And here is the application live:
You can open the application full screen in a new tab clicking here
Getting started
To create a new serverless app create a new Gradle project in Intellij IDEA and select Java. Like so:
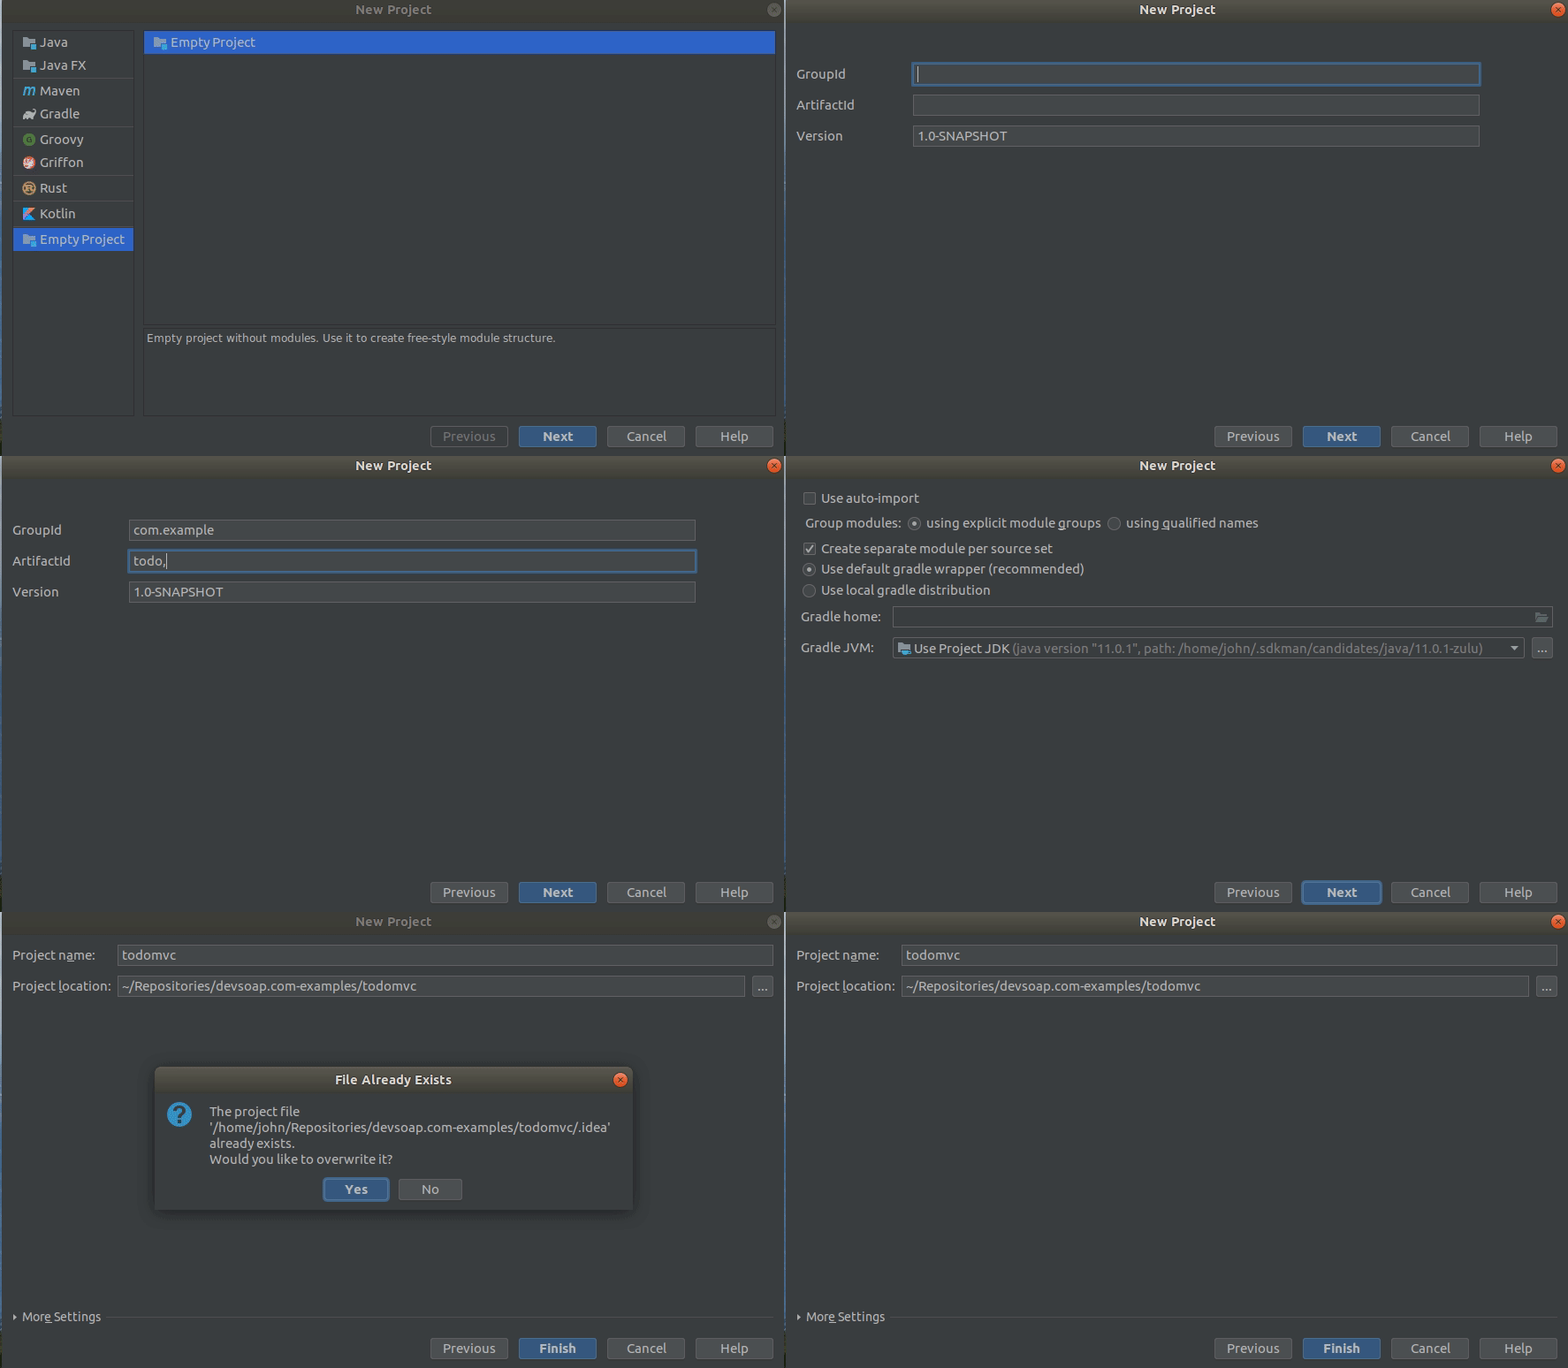
Next we will need to configure our Gradle build to create Serverless applications.
In the newly created project, open up the build.gradle file and replace its contents with the following:
plugins {
    // For support for Serverless FN applications
    id 'com.devsoap.fn' version '0.1.7' apply false
    // For support for fetching javascript dependencies
    id "com.moowork.node" version "1.2.0" apply false
}

group 'com.example'

subprojects {

    // Apply the plugin to all sub-projects
    apply plugin: 'com.devsoap.fn'

    // We want to develop with Java 11
    sourceCompatibility = 11
    targetCompatibility = 11

    // Add Maven Central and the FN Project repositories
    repositories {
        mavenCentral()
        fn.fnproject()
    }

    // Add the FN function API dependency
    dependencies {
        compile fn.api()
    }
}
As you probably already figured out we are going build a multi-module Gradle project where our sub-modules will be FN functions. To do that we leverage the Devsoap FN Gradle plugin as well as the Moowork Node plugin.
Also, you might want to remove any src folder that was generated for the parent project, our sources will be in the submodules.
Here is how it will look like:
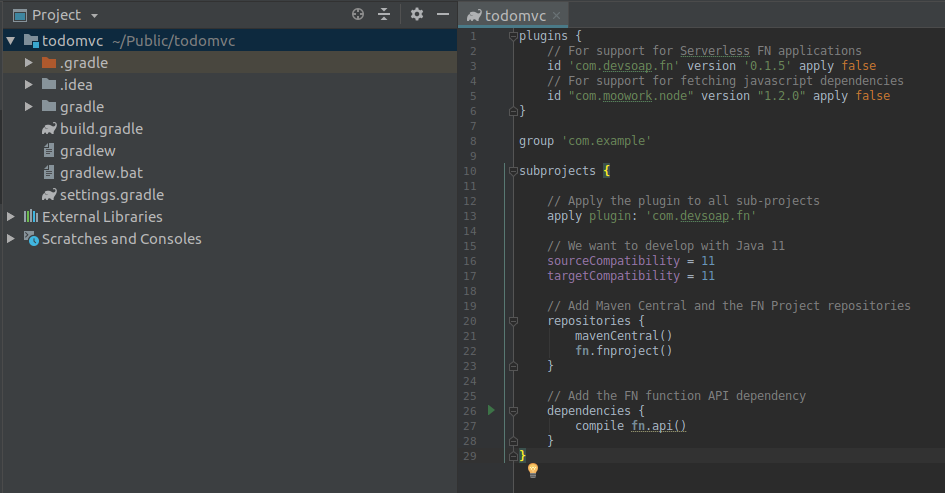
Next, lets create our first function!
Right click on the project, and create a new UI module:
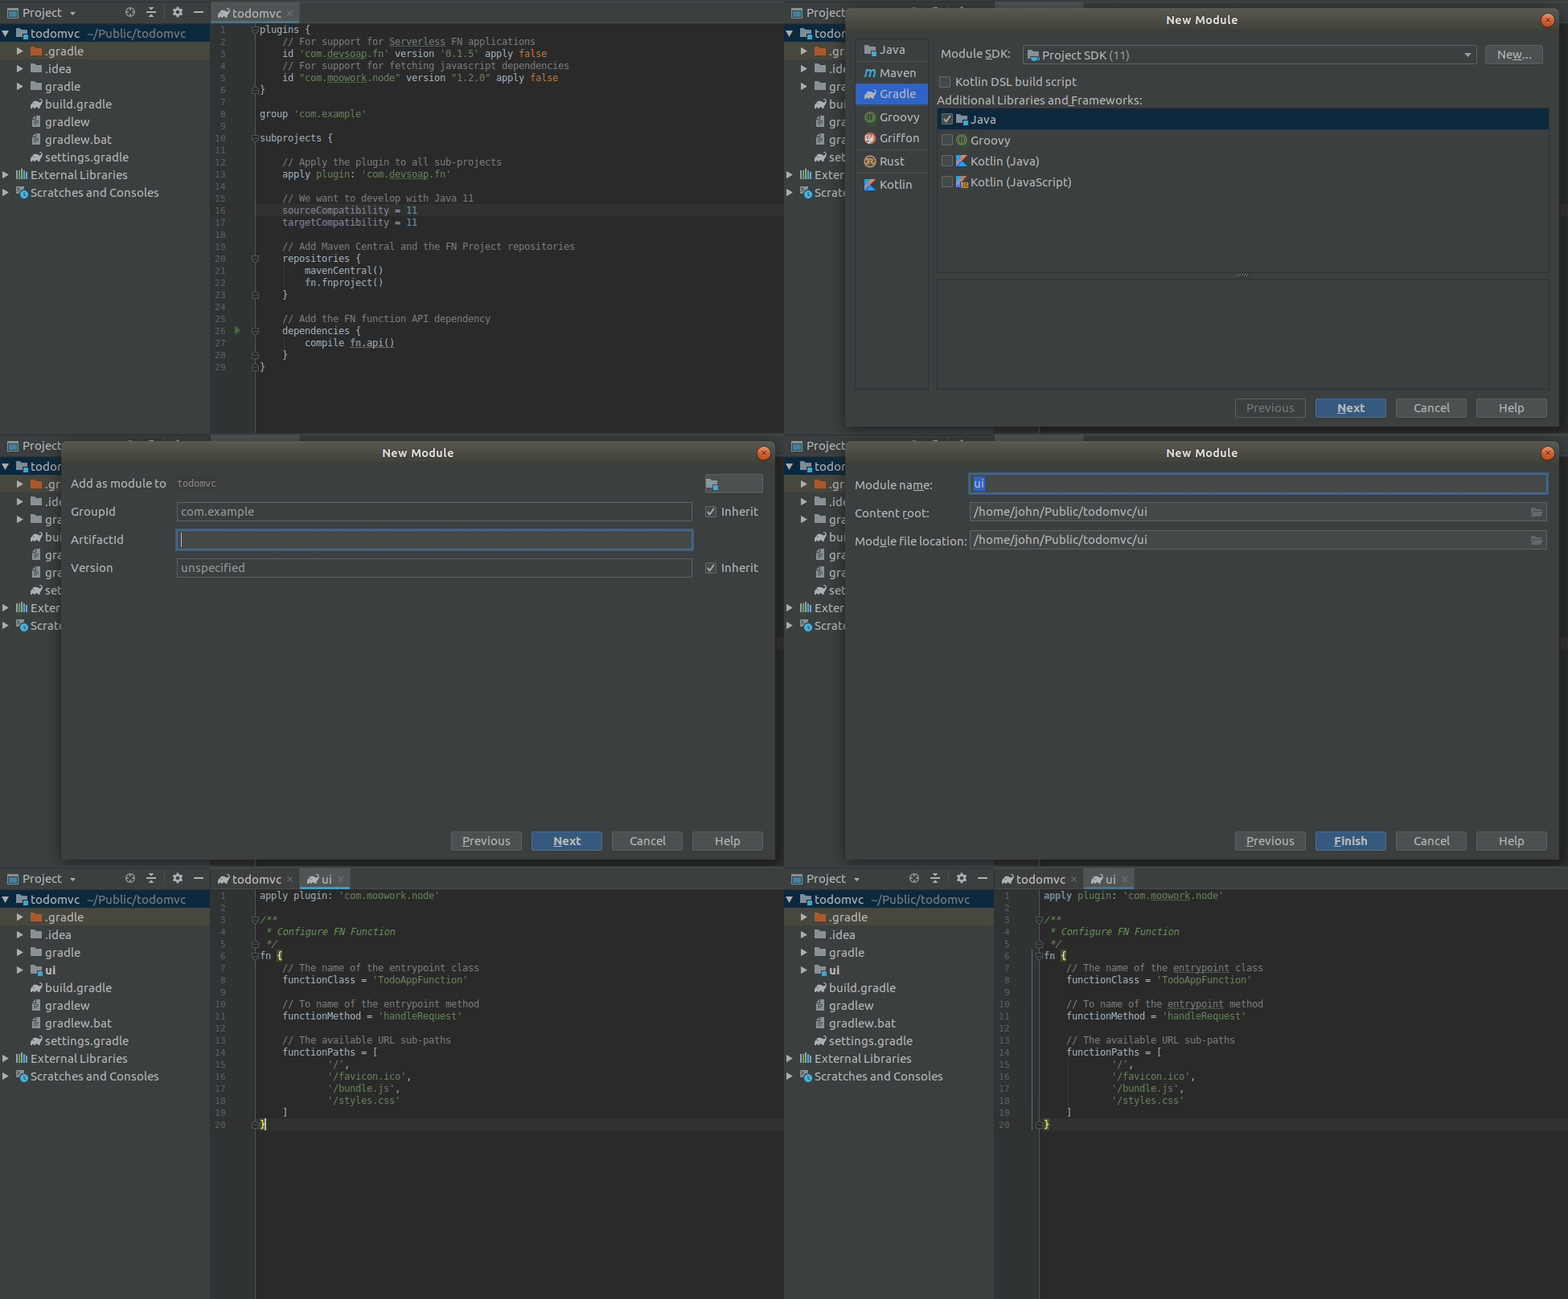
As we did before, remove any src folder which is automatically created.
Open up the ui/build.gradle file if it is not open yet, and replace the contents with the following:
apply plugin: 'com.moowork.node'

/**
 * Configure FN Function
 */
fn {
    // The name of the entrypoint class
    functionClass = 'TodoAppFunction'

    // To name of the entrypoint method
    functionMethod = 'handleRequest'

    // The available URL sub-paths
    functionPaths = [
            '/',
            '/favicon.ico',
            '/bundle.js',
            '/styles.css'
    ]
}
Lets take a look at what this means.
On the first line we are applying the Node Gradle plugin. We are later going to use it to compile our front-end React application.
Then we configure the Fn function.
functionClass will be th main class of our UI, this is the class which is called when somebody accesses our application.
functionMethod is the actual method that will get called. This will host our function logic.
functionPaths are all the sub-paths our function will listen to. We will have to implement some logic to handle all of these paths.
Right, now we have our function definition, but we don't yet have our function sources. Lets create them.
From the right-hand side gradle navigation menu, open up the UI Fn tasks groups and double-click on fnCreateFunction.
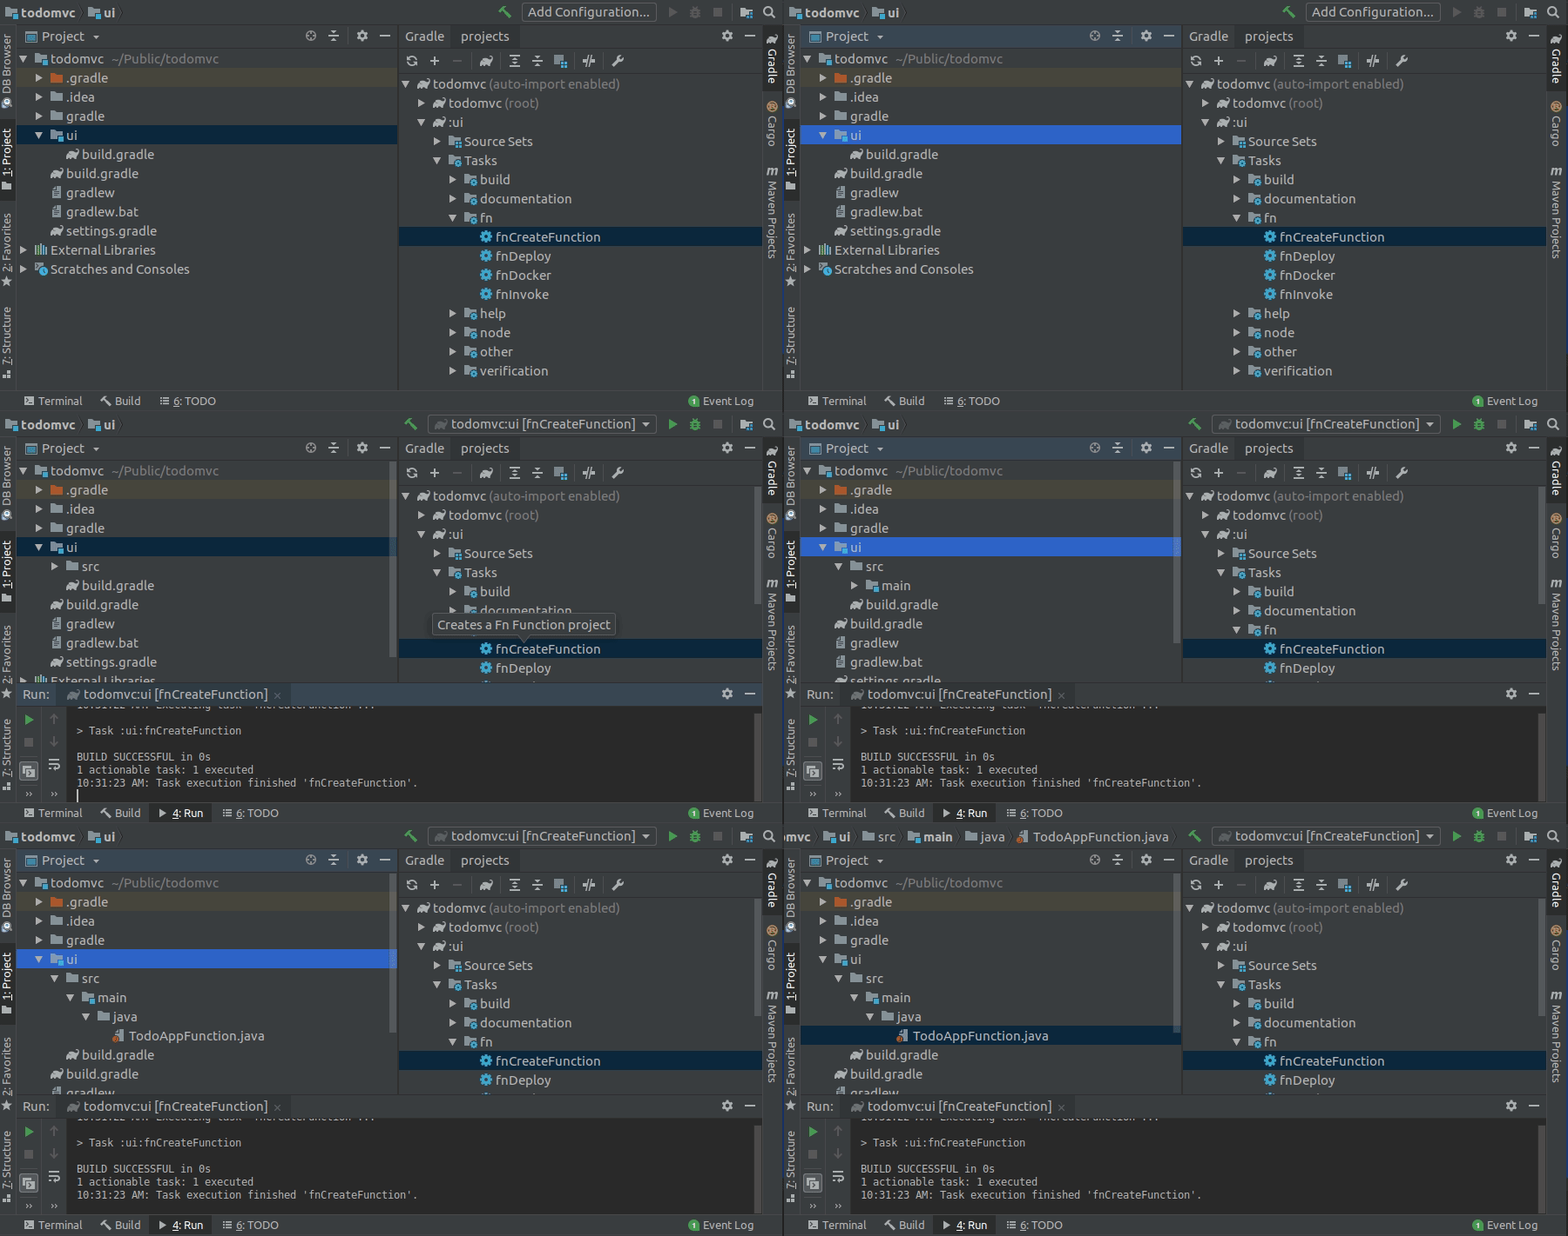
Lets have a look at the created function:
import static java.util.Optional.ofNullable;

public class TodoAppFunction {

    public String handleRequest(String input) {
        String name = ofNullable(input).filter(s -> !s.isEmpty()).orElse("world");
        return "Hello, " + name + "!";
    }
}
It by default generates a basic Hello world type of function which is not very exciting. Lets now add our function logic to it so it looks like this:
/**
 * Serves our react UI via a function call
 */
public class TodoAppFunction {

    private static final String APP_NAME = "todomvc";

    /**
     * Handles the incoming function request
     *
     * @param context
     *      the request context
     *
     * @return
     *      the output event with the function output
     */
    public OutputEvent handleRequest(HTTPGatewayContext context) throws IOException {
        var url = context.getRequestURL();
        var filename = url.substring(url.lastIndexOf(APP_NAME) + APP_NAME.length());
        if("".equals(filename) || "/".equals(filename)) {
            filename = "/index.html";
        }

        var body = loadFileFromClasspath(filename);

        var contentType = Files.probeContentType(Paths.get(filename));
        if(filename.endsWith(".js")) {
            contentType = "application/javascript";
        } else if(filename.endsWith(".css")) {
            contentType = "text/css";
        }

        return OutputEvent.fromBytes(body, OutputEvent.Status.Success, contentType);
    }

    /**
     * Loads a file from inside the function jar archive
     *
     * @param filename
     *      the filename to load, must start with a /
     * @return
     *      the loaded file content
     */
    private static byte[] loadFileFromClasspath(String filename) throws IOException {
        var out = new ByteArrayOutputStream();
        try(var fileStream = TodoAppFunction.class.getResourceAsStream(filename)) {
            fileStream.transferTo(out);
        }
        return out.toByteArray();
    }
}
Lets look at the function implementation a bit:
We create a helper method loadFileFromClasspath that will load any file from the current function classpath. By using the helper method we will be able to serve any static resources via our function.
Next, to the meat of the bones, the handleRequest method. This is the entry point method where all requests will arrive that are made to the function.
If you remember from the function definition we did previously, we assigned four sub-paths to the url; '/', '/favicon.ico', '/bundle.js',
and '/styles.css'. What we simply do in handleRequest is examine the incoming URL and extract the filename from it. Then, load the file from our classpath. In essence, the function we have created is a static file loader!
What about security, will this mean that you can now load any file via this function? The answer is of course no, you will only be able to call the function with the give sub-paths in the function definition. Any other paths will just not arrive to this function.
Including the static files
We now have our function, but it will not yet return anything as we don't yet have the static files we have defined in our function definition.
Lets start with our bootstrap HTML file we want to serve.
We create a file named index.html and place it under src/main/resources. By placing the file there it will be included in our function resources and can be found from the classpath by using our function we defined above.
<!DOCTYPE html>
<html lang="en">
    <head>
        <meta charset="UTF-8">
        <title>TodoMVC - A fully serverless todo app!</title>
        <link rel="shortcut icon" href="todomvc/favicon.ico" />
        <link rel="stylesheet" type="text/css" href="todomvc/styles.css">
    </head>
    <body>
        <div id="todoapp" />
        <script src="todomvc/bundle.js"></script>
    </body>
</html>
Pretty basic stuff, we define a favicon and a css style sheet in the head section and in the body we define the root div-element and the bootstrap.js script for our React app.
Next we create a CSS file under src/main/resources and call it styles.css. In it we define some styles for the application:
body {
    background: #f5f5f5;
    font-weight: 100;
}
.container {
    background: #fff;
    width:600px;
    margin-left: auto;
    margin-right: auto;
}
h3 {
    color: rgba(175, 47, 47, 0.15);
    font-size: 100px;
    background: #f5f5f5;
    text-align: center;
    margin: 0;
}
.inner-container {
    border: 1px solid #eee;
    box-shadow: 0 0 2px 2px #eee
}
#new-todo {
    background: none;
    margin-top:10px;
    margin-left:5%;
    width:95%;
    font-size: 24px;
    height: 2em;
    border: 0;
}
.items {
    list-style: none;
    font-size: 24px;
}
.itemActive {
    width: 2em;
    height: 2em;
    background-color: white;
    border-radius: 50%;
    vertical-align: middle;
    border: 1px solid #ddd;
    -webkit-appearance: none;
    outline: none;
    cursor: pointer;
    margin-right:20px
}
.itemActive:checked {
    background-color: lightgreen;
}
.itemRemove {
    float:right;
    margin-right: 20px;
    color: lightcoral;
    text-decoration: none;
}
footer {
    width:100%;
    height:50px;
    line-height: 50px;
    color: #777
}
.itemsCompleted {
    padding-left: 20px;
}
.activeStateFilter {
    width:70%;
    float: right
}
.stateFilter {
    margin:10px;
    cursor: pointer;
     padding: 2px;
}

.stateFilter.active {
    border: 1px solid silver;
    border-radius: 4px
}
If you've done any webapps before this shouldn't be anything new.
Finally we download a nice favicon.ico file for our application and also place it under src/main/resources. You can find some nice ones from https://www.favicon.cc or design a new one yourself if you are the creative type. For our demo I chose this one.
Building the UI with React and Gradle
Now that we have our static files in place we still need to build our front-end React application.
We start by defining our front-end dependencies in a file called package.js in the root folder of the UI project. It will look like this:
{
    "name": "ui",
    "version": "1.0.0",
    "main": "index.js",
    "license": "MIT",
    "babel": {
        "presets": [
            "@babel/preset-env",
            "@babel/preset-react"
        ]
    },
    "scripts": {
        "bundle": "webpack-cli --config ./webpack.config.js --mode=production"
    },
    "devDependencies": {
        "@babel/core": "^7.2.2",
        "@babel/preset-env": "^7.3.1",
        "@babel/preset-react": "^7.0.0",
        "babel-loader": "^8.0.5",
        "css-loader": "^2.1.0",
        "html-webpack-inline-source-plugin": "^0.0.10",
        "html-webpack-plugin": "^3.2.0",
        "style-loader": "^0.23.1",
        "webpack": "^4.29.0",
        "webpack-cli": "^3.2.1"
    },
    "dependencies": {
        "babel": "^6.23.0",
        "babel-core": "^6.26.3",
        "react": "^16.7.0",
        "react-dom": "^16.7.0",
        "whatwg-fetch": "^3.0.0"
    }
}
This should be a very standard set of dependencies when building React apps.
Next we are going to use Webpack and Babel to bundle all our Javascript source files into one single bundle.js that also will get included in our static resources.
To do that we need to create another file, webpack.config.js in our UI root folder to tell the compiler how to locate and bundle our javascript files. In our case it will look like this:
var path = require('path');

module.exports = {
    entry: [
        'whatwg-fetch',
        './src/main/jsx/todo-app.js'
    ],
    output: {
        path: path.resolve(__dirname, './build/resources/main'),
        filename: 'bundle.js'
    },
    module: {
       rules: [
         {
           test: /\.(js|jsx)$/,
           exclude: /node_modules/,
           use: ['babel-loader']
         }
       ]
     },
     resolve: {
       extensions: ['*', '.js'],
     }
}
There are two noteworthy things I should mention about this.
In the entry section we are pointing to a javascript source file that will act as our main application entry point. In a moment we are going to create that file.
In output we are setting the path where we want to output the ready bundle.js file. In our case we want to output to build/resources/main as that is what Gradle will use when packaging our function.
Note: We could also have set the path to src/main/resources and it would have worked. But it is a good idea to separate generated files we don't commit to version control from static files we want to commit to version control.
Now that we have our configurations in place, we still need to instruct our Gradle build to build the front-end. We do so by adding the following task to our build.gradle file:
/**
 * Configre Node/NPM/YARN
 */
node {
    download = true
    version = '11.8.0'
}

/**
 * Bundles Javascript sources into a single JS bundle to be served by the function
 */
task bundleFrontend(type: YarnTask) {
    inputs.file project.file('package.json')
    inputs.file project.file('yarn.lock')
    inputs.files project.fileTree('src/main/html')
    inputs.files project.fileTree('src/main/jsx')
    outputs.file project.file('build/resources/main/bundle.js')
    yarnCommand = ['run', 'bundle']
}
jar.dependsOn(bundleFrontend)
What this task will do is download all necessary client dependencies using Yarn (package manager) and then it will compile our sources into the bundle.js file.
The last line indicates that whenever we are building the function we should do this to ensure the latest bundle is included in the function distribution.
Now the only thing we are missing are the actual Javascript source files. So we create a new directory src/main/jsx and in it we place two source files:
todo-app.js
import React from 'react';
import ReactDOM from 'react-dom';
import TodoList from './todo-list.js'

/**
 * Todo application main application view
 */
class TodoApp extends React.Component {

  constructor(props) {
    super(props);
    this.state = { items: [], filteredItems: [], text: '', filter: 'all' };
    this.handleChange = this.handleChange.bind(this);
    this.handleSubmit = this.handleSubmit.bind(this);
    this.handleActiveChange = this.handleActiveChange.bind(this);
    this.handleRemove = this.handleRemove.bind(this);
    this.handleFilterChange = this.handleFilterChange.bind(this);
  }

  componentDidMount() {
      fetch("todomvc/items")
        .then(result => { return result.json() })
        .then(json => { this.setState({items: json}) })
        .catch(ex => { console.log('parsing failed', ex) });
  }

  componentWillUpdate(nextProps, nextState) {
        if(nextState.filter === 'all') {
            nextState.filteredItems = nextState.items;
        } else if(nextState.filter === 'active') {
           nextState.filteredItems = nextState.items.filter(item => item.active);
        } else if(nextState.filter === 'completed') {
           nextState.filteredItems = nextState.items.filter(item => !item.active);
        }
  }

  render() {
    return (
      <div class="container">
        <h3>todos</h3>
        <div class="inner-container">
            <header class="itemInput">
                <form onSubmit={this.handleSubmit}>
                  <input
                    id="new-todo"
                    onChange={this.handleChange}
                    value={this.state.text}
                    placeholder="What needs to be done?"
                  />
                </form>
            </header>
            <section class="itemList">
                <TodoList items={this.state.filteredItems} onActiveChange={this.handleActiveChange} onRemove={this.handleRemove} />
            </section>
            <footer class="itemControls">
                <span class="itemsCompleted">{this.state.items.filter(item => item.active).length} items left</span>
                <span class="activeStateFilter">
                    <span filter="all" class={this.state.filter === 'all' ? "stateFilter active" : "stateFilter"} onClick={this.handleFilterChange}>All</span>
                    <span filter="active" class={this.state.filter === 'active' ? "stateFilter active" : "stateFilter"} onClick={this.handleFilterChange}>Active</span>
                    <span filter="completed" class={this.state.filter === 'completed' ? "stateFilter active" : "stateFilter"} onClick={this.handleFilterChange}>Completed</span>
                </span>
            </footer>
        </div>
      </div>
    );
  }

  handleChange(e) {
    this.setState({ text: e.target.value });
  }

  handleSubmit(e) {
    e.preventDefault();
    if (!this.state.text.length) {
      return;
    }

    const newItem = {
      description: this.state.text,
    };

    fetch('todomvc/items', {
      method: 'POST',
      headers: { 'Content-Type': 'application/json' },
      body: JSON.stringify(newItem)
    }).then(result => {
       return result.json();
    }).then(json => {
       this.setState( state => ({ items: state.items.concat(json), text: ''}) );
    }).catch(ex => {
      console.log('parsing failed', ex);
    });
  }

  handleActiveChange(newItem) {
    this.setState( state => ({
        text: '',
        items: state.items.map(oldItem => {
            if(oldItem.id === newItem.id) {
                fetch('todomvc/items', {
                      method: 'PUT',
                      headers: { 'Content-Type': 'application/json' },
                      body: JSON.stringify(newItem)
                }).then(result => {
                  return result.json();
               }).then(json => {
                  return json;
               })
            }
            return oldItem;
        })
    }));
  }

  handleRemove(item) {
    fetch('todomvc/items', {
          method: 'DELETE',
          headers: { 'Content-Type': 'application/json' },
          body: JSON.stringify(item)
    }).then( result => {
        this.setState(state => ({
            items: state.items.filter(oldItem => oldItem.id != item.id)
        }))
    });
  }

  handleFilterChange(e) {
    var filter = e.target.getAttribute("filter");
    this.setState( state => ({
        filter: filter
    }));
  }

}

ReactDOM.render(<TodoApp />, document.getElementById("todoapp"));
And todo-list.json:
import React from 'react';
/**
* Todo list for managing todo list items
*/
export default class TodoList extends React.Component {
render() {
return (
<ul>
{this.props.items.map(item => (
<li class="items" key={item.id}>
<input class="itemActive" itemId={item.id} name="isDone" type="checkbox" checked={!item.active}
onChange={this.handleActiveChange.bind(this)} />
<span class="itemDescription">{item.description}</span>
<a class="itemRemove" itemId={item.id} href="#" onClick={this.handleRemove.bind(this)} >☓</a>
</li>
))}
</ul>
);
}
handleActiveChange(e) {
var itemId = e.target.getAttribute('itemId');
var item = this.props.items.find ( item => { return item.id === itemId })
item.active = !item.active;
console.log("Changed active state of "+item.description + " to " + item.active);
this.props.onActiveChange(item);
}
handleRemove(e) {
var itemId = e.target.getAttribute('itemId');
var item = this.props.items.find ( item => { return item.id === itemId })
console.log("Removing item " + item.description);
this.props.onRemove(item);
}
}
Both of these javascript source files are pretty basic if you have done React before. if you haven't check any primer, the concepts used here are described in any resource available.
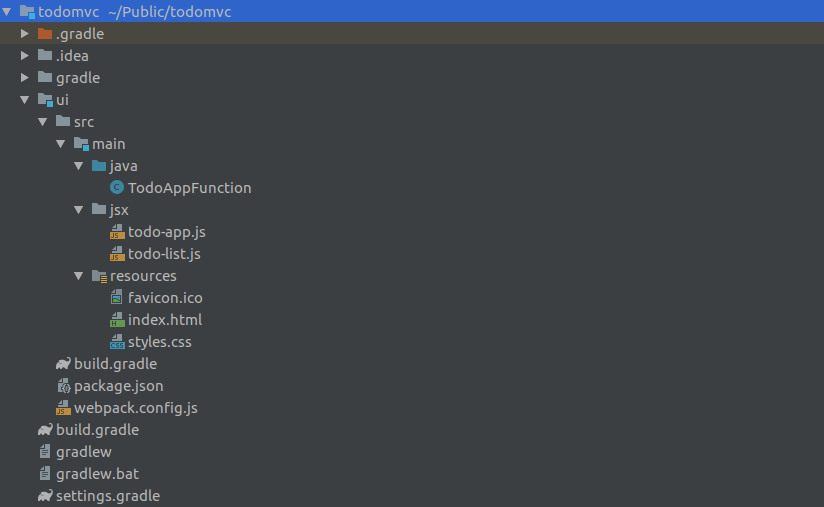
Now we have everything we need for our app. Lets have a final look how our project structure now looks like:
Running the project
Of course when we develop the project we also want to try it out on our local machine. Before you continue you will need Docker, so install that first.
To get your development FN server running, run the fnStart task from the root project:
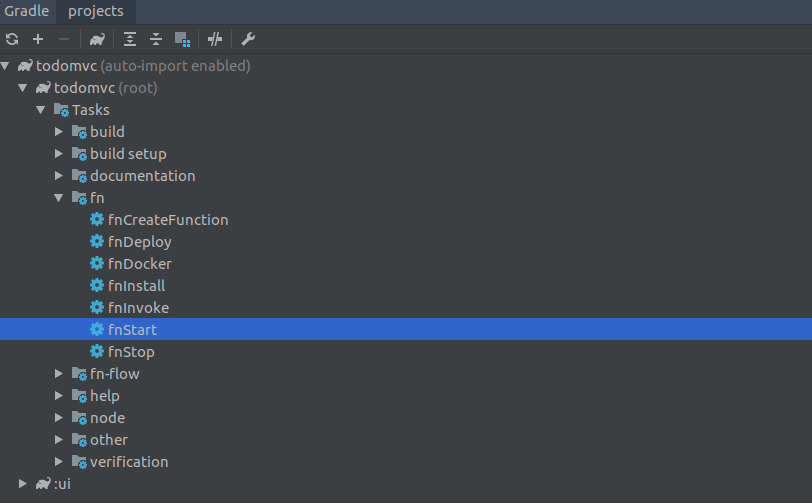
Once the server is running you can deploy the function by double-clicking on the fnDeploy task.
Once the function is deployed you should be able to access it on http://localhost:8080/t/todomvc.
To be Cont’d!
We are now finished with the front-end function. But if you run the application we just made you will notice it is not working.
In the next part we will finish the application and hook our front-end function up to our back-end API and DynamoDB. Check it out!