Gradle, Vaadin 7 and Multi-Module projects
As Vaadin 7 has reached beta, Gradle has reached its 1.2 release and APIs are settling down I thought this would be a good time to take a look at how the projects have progressed and look at how we can build multi module projects with Gradle and Vaadin. To do this I will create an RSS/Atom feed reader you can use to read your favourite feeds with.
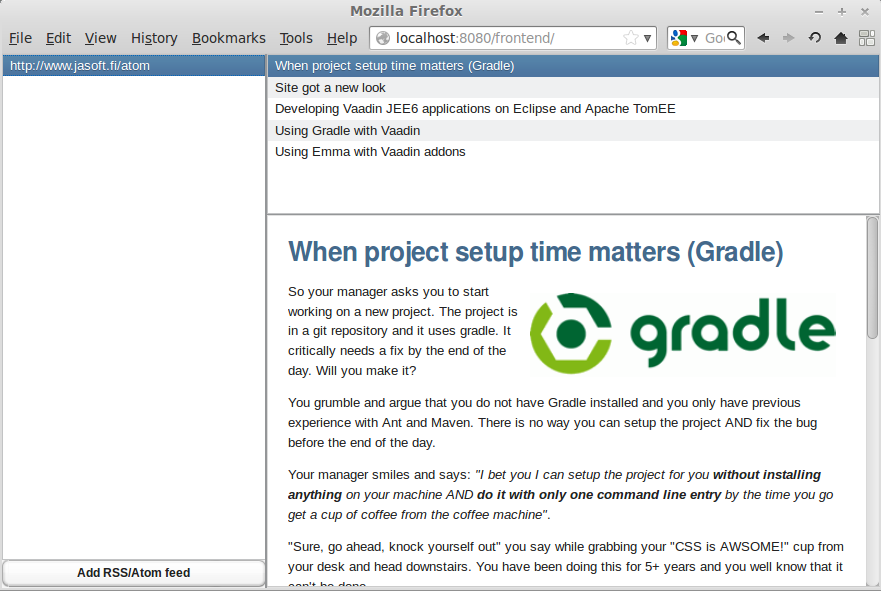
All the sources for the example application can be found at https://github.com/johndevs/feedreader. To quickly get started tinkering with the application, clone the project from github and run ./gradlew jettyRun in the project root folder. The application will be running on http://localhost:8080/frontend.
The project will be divided into three sub modules; one for the data layer, one for the service layer, and finally one for the frontend.
The service layer will depend on the data layer and the frontend will depend on the service layer (and implicitly on the data layer).
The parent module
This time I am not going to involve an IDE just yet, instead, I am going to setup the project folders first and then let Gradle create all the necessary eclipse project files.
So , lets create the project structure shown to the left. You can do either on the console or in your favourite file manager.
As you'll notice we create a main project folder where all the sub modules reside. The main project folder will contain the main build.gradle and settings.gradle files. The sub modules will each contain a build.gradle file. The *.gradle files can be left empty for now, we are going to fill them as we go along.
Now that we have our basic folder structures, lets start by defining our sub modules in settings.gradle:
include 'data'
include 'service'
include 'frontend'
It is really that simple, just one include statement for each sub module and we are done.
Let's proceed by taking a look at the main build.gradle file located in the root of the project:
allprojects{
    group = 'fi.jasoft.feedreader'
    version = '0.0.1'
}
subprojects{
    apply plugin: 'java'
    apply plugin: 'eclipse'
    sourceCompatibility = 1.6
    targetCompatibility = 1.6

    repositories{
        mavenCentral()
        mavenRepo name:'EclipseLink', url:'http://download.eclipse.org/rt/eclipselink/maven.repo'
    }
}
First we define some common properties for all the projects. In this case the group and version of the project. Then we define some common properties for all the sub modules.
We are going to use two plugins in all our projects; the java plugin since all our sub modules will be written in Java and the eclipse plugin since we are going to be working in eclipse. We also set the source and target compatibility to Java 6 since it is what we are going to use in all the projects.
We also need to provide the repositories which we are going to use in the sub module. In our case it is Maven Central as well as the EclipseLink repository.
Now that the general setup is done, lets take a look into how to configure each of the sub modules.
Lets start with the data module's data/build.gradle configuration:
dependencies{
    compile group:'hsqldb', name:'hsqldb', version:'1.8.0.10'
    compile group:'org.eclipse.persistence', name:'eclipselink', version:'2.3.2'
    compile group:'org.eclipse.persistence', name:'javax.persistence', version:'2.0.3'
}
We are going to use HSQLDB as our database with EclipseLink as our persistence provider. To do that we will need to add dependencies for both HSQLDB as well as EclipseLink. Nothing more to add here.
Next up the service layers configuration service/build.gradle
dependencies{
    compile project(':data')
    compile group:'rome', name:'rome', version:'0.9'
}
Even less here. As you see here the service layer will depend on the data layer as well as on the ROME library which we are going to use to read the RSS/ATOM feeds with.
Finally we are going to look at our frontend build configuration frontend/build.gradle:
apply plugin: 'war'
apply plugin: 'jetty'

def vaadinVersion = '7.0.0.beta1'

dependencies{
    compile project(':service')
    compile group:'com.vaadin', name:'vaadin-server', version:vaadinVersion
    compile group:'com.vaadin', name:'vaadin-client-compiled', version:vaadinVersion
    compile group:'com.vaadin', name:'vaadin-themes', version:vaadinVersion
}
We are going to add two plugins to the frontend. The first one is the WAR plugin which will generate our WAR archive to deploy to any application server. The second one is the jetty plugin which we are going to use to quickly test our project with.
As a convenience we define the vaadin version we are going to use so we don't have to repeat it in the dependencies and it is easy to update in the future.
Finally, our frontend will depend on the service layer as well as on the Vaadin libraries so we add those to the project dependencies.
What you will notice when you upgrade to Vaadin 7 beta 1 is that the Vaadin project is no longer distributed as one huge jar archive, instead it is split into several smaller artifacts we can choose from. Our project will be a server side only project with the default Vaadin widgets and themes, so we are only going to need the packages 'vaadin-server' (Vaadin API), 'vaadin-client-compiled' (widgets) and 'vaadin-themes' (themes).
And that is it for our configuration.
Since we are going to work in eclipse we will now need to generate our eclipse project files so we can open up eclipse and start working on our code. To generate the necessary files open up a console and go to the root folder of the project.
Next tell gradle to generate the eclipse projects by using the following command in the root folder of the project:
$ ./gradlew eclipse
If all goes well, which it should if you have your configuration setup correctly, the output should look like this (artifact downloads omitted):
$ ./gradlew eclipse
:data:eclipseClasspath
:data:eclipseJdt
:data:eclipseProject
:data:eclipse
:frontend:eclipseClasspath
:frontend:eclipseJdt
:frontend:eclipseProject
:frontend:eclipse
:service:eclipseClasspath
:service:eclipseJdt
:service:eclipseProject
:service:eclipse

BUILD SUCCESSFUL

Total time: 17.09 secs
If it fails, go over the configuration files and check that they are exactly the same as I have made them.
As you can see from the output, Gradle has generated eclipse project files for each subproject and we can now import these projects into eclipse and start working on the code.
Importing the projects is really easy, just open up eclipse and the workspace you want to import the projects to. Then select File->Import->General->Existing Projects Into Workspace and you will be greeted by a window like this:
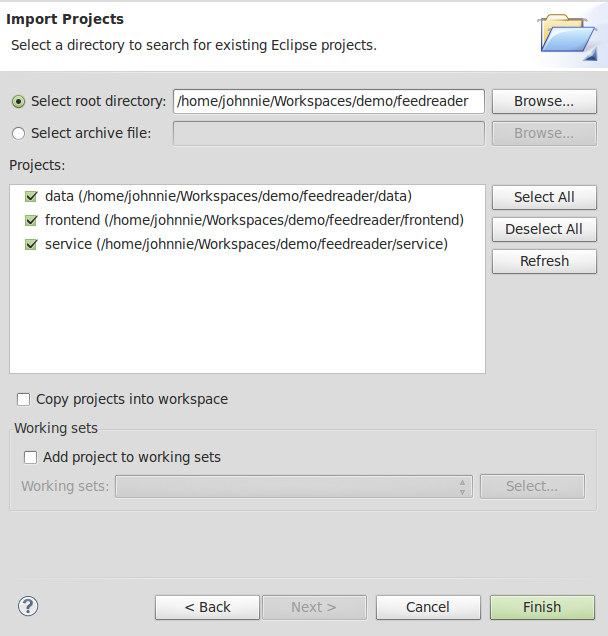
Select the root directory of the project and you should see the sub-projects listed as I have them below. Click finish and you should have three new projects in your workspace.
Now we can start with the coding part!
The data layer module
The first thing we will need to do is add some source folders and packages where we are going to place our source code. So, while in Eclipse, right click on the data project and add two new source folders, src/main/java and src/main/resources.
To src/main/java add a new package fi.jasoft.feedreader.data.
To src/main/resources add a new folder META-INF.
When you are done your project should look like to the left.
To keep things simple we will only have one entity in the project. I will name it Feed and it will represent a RSS/Atom feed we can read in our feed reader.
It looks like this (I will not include package,imports and getters and setters to keep the code brief):
@Entity
public class Feed {
    @Id @GeneratedValue(strategy=GenerationType.SEQUENCE) long id;
    @Version int version;
    @Column(length=256,nullable=false,unique=true) String url;
    @ElementCollection List<FeedEntry> entries;

    /* Getters and Setters omitted */
}
As you can see our feed has an unique URL and contains some entries.
Next, lets look at the FeedEntry which is even simpler:
@Embeddable
public class FeedEntry {

    @Column(length=256) String title;
    @Lob String content;
    @Column(length=256) String url;
    /* Getters and Setters omitted */
}
As you see each RSS/Atom feed entry will have an title, an url and some content.
Finally we need to tell our persistence provider about our entity and embeddable. We do this by creating an persistence.xml file under the META-INF folder with the following content:
<?xml version="1.0" encoding="UTF-8"?>
<persistence xmlns="http://java.sun.com/xml/ns/persistence"
    xmlns:xsi="http://www.w3.org/2001/XMLSchema-instance"
    xsi:schemaLocation="http://java.sun.com/xml/ns/persistence
    http://java.sun.com/xml/ns/persistence/persistence_2_0.xsd"
    version="2.0">
    <persistence-unit name="feed-reader" transaction-type="RESOURCE_LOCAL">
        <provider>org.eclipse.persistence.jpa.PersistenceProvider</provider>

        <class>fi.jasoft.feedz.data.Feed</class>

        <exclude-unlisted-classes>true</exclude-unlisted-classes>
        <properties>
             <property name="eclipselink.jdbc.driver" value="org.hsqldb.jdbcDriver" />
             <property name="eclipselink.jdbc.url" value="jdbc:hsqldb:file:/tmp/feed-reader/db;create=true" />
             <property name="eclipselink.jdbc.user" value="sa" />
             <property name="eclipselink.jdbc.password" value="" />
             <property name="eclipselink.target-database"
                       value="org.eclipse.persistence.platform.database.HSQLPlatform" />
             <property name="eclipselink.logging.level" value="OFF" />
             <property name="eclipselink.orm.throw.exceptions" value="true" />
             <property name="eclipselink.ddl-generation" value="create-tables" />
             <property name="eclipselink.ddl-generation.output-mode" value="database" />
        </properties>
    </persistence-unit>
</persistence>
The important part is the
As you'll also notice we setup our HSQLDB database in the file. The importat bit here is that we'll store the database under /tmp/feed-reader. You should make sure that you have read/write permissions to this location or change it to something more suitable before trying out the demo.
That is it for our data layer. Next we'll move on to make some services which uses our data layer.
The service layer module
Lets again start by creating the source folders and packages.
This time we will only need one source folder src/main/java.
Also create a package fi.jasoft.feedreader.service where we are going to put our service classes in.
Once done your project structure should look like to the left.
Now we are going to create our FeedService which will provide our user interface with our persisted feeds and synchronize the feed entries with the online RSS/ATOM feed.
Here is the interface for our feed service (FeedService.java):
public interface FeedService {
    void add(Feed feed);
    void remove(Feed feed);
    List<Feed> getFeeds();
    void save(Feed feed);
    void syncronize(Feed feed);
}
Pretty self explanatory I'd say. However, you might wonder what the last method syncronize() does. It will fetch the online RSS/Atom feed from the URL given in the feed and then persist the changes into our local database for offline reading.
The other class FeedServiceImpl implements this interface. I won't add it here since it is too long for the article and not really relevant since it is mostly JPA, but if you want to look at it, it can be found on github.
And that is all for our service layer.
The frontend module (Vaadin)
Note: This part of the article is no longer relevant as a better practice is to use the Gradle Vaadin Plugin to build the project with. Please refer to the example application in Github which has been updated to use Vaadin 8 and the Gradle Vaadin plugin.
Now that we have a way to communicate with the data layer, using our new service layer, we are ready to build the user interface for our application. The file structure and the files we are going to need are shown to the left.
First, we will need two source folders src/main/java and src/main/webapp.
The first source folder is already familiar from the other projects but what about this webapp folder? The webapp source folder is used by the WAR Gradle plugin as the base for the war-archive. In here we put static files and other resources which should be included in the archive. In our case we are only going to need the web.xml to define some parameters for our Vaadin application.
Lets take a look at web.xml, it is quite short.
<?xml version="1.0" encoding="UTF-8"?>
<web-app id="WebApp_ID" version="2.4" xmlns="http://java.sun.com/xml/ns/j2ee" xmlns:xsi="http://www.w3.org/2001/XMLSchema-instance" xsi:schemaLocation="http://java.sun.com/xml/ns/j2ee http://java.sun.com/xml/ns/j2ee/web-app_2_4.xsd">
        <display-name>Test</display-name>
        <context-param>
                <description>Vaadin production mode</description>
                <param-name>productionMode</param-name>
                <param-value>false</param-value>
        </context-param>
        <servlet>
                <servlet-name>Feed Reader</servlet-name>
                <servlet-class>com.vaadin.server.VaadinServlet</servlet-class>
                <init-param>
                        <description>Vaadin UI class to start</description>
                        <param-name>UI</param-name>
                        <param-value>fi.jasoft.feedreader.ui.ReaderUI</param-value>
                </init-param>
        </servlet>
        <servlet-mapping>
                <servlet-name>Feed Reader</servlet-name>
                <url-pattern>/*</url-pattern>
        </servlet-mapping>
</web-app>
What is important here is that we defined the servlet to be the com.vaadin.server.VaadinServlet and gave it the UI parameter with the value fi.jasoft.feedreader.ui.ReaderUI which defines where the servlet can find our user interface class.
If you have been using Vaadin 6 previously then you have defined the application instance the same way. With Vaadin 7 there are no more applications, instead UIs are used in a similar fashion.
Next, lets look at our user interface class (ReaderUI.java). I have removed all imports and javadoc to keep it short, for the full version see the source on github.
public class ReaderUI extends UI implements Action.Handler{

    // Feed service
    private final FeedService feedService = new FeedServiceImpl();

    // Data providers
    private final BeanItemContainer<FeedEntry> entries = new BeanItemContainer<FeedEntry>(FeedEntry.class);
    private final BeanItemContainer<Feed> feeds = new BeanItemContainer<Feed>(Feed.class);
    {
        // Fetch feeds from db
        feeds.addAll(feedService.getFeeds());
    }

    // UI components
    protected Panel entryPanel = new Panel();
    protected Table feedTable;
    protected Table entryTable;

    // Feed actions
    private Action ADD_FEED_ACTION = new Action("Add RSS/Atom feed");
    private Action REMOVE_FEED_ACTION = new Action("Remove RSS/Atom feed");
    private Action SYNCRONIZE_ACTION = new Action("Syncronize feed");

    @Override
    protected void init(WrappedRequest request) {

        // Create data tables
        feedTable = createFeedsTable();
        entryTable = createEntriesTable();

        // Create the main horizontal split panel
        HorizontalSplitPanel content = new HorizontalSplitPanel();
        content.setStyleName(Reindeer.SPLITPANEL_SMALL);
        content.setSizeFull();
        setContent(content);

        // Create the content of the left part of the main split panel
        VerticalLayout vl = new VerticalLayout();
        vl.setSizeFull();
        vl.addComponent(feedTable);

        Button addFeedBtn = new Button("Add RSS/Atom feed", new Button.ClickListener() {
            @Override
            public void buttonClick(ClickEvent event) {
                addFeed();
            }
        });
        addFeedBtn.setWidth("100%");
        vl.addComponent(addFeedBtn);
        vl.setExpandRatio(feedTable, 1);

        content.setFirstComponent(vl);
        content.setSplitPosition(30);

        // Create and set the content of the right part of the main split panel
        VerticalSplitPanel rightPane = new VerticalSplitPanel();
        rightPane.setStyleName(Reindeer.SPLITPANEL_SMALL);
        rightPane.setSizeFull();

        rightPane.addComponent(entryTable);

        entryPanel.setSizeFull();
        rightPane.addComponent(entryPanel);

        content.addComponent(rightPane);
        rightPane.setSplitPosition(30);

        if(feeds.size() > 0){
            feedTable.setValue(feeds.getItemIds().iterator().next());
        }
    }

    private void addFeed(){
        final AddFeedWindow addFeedWindow = new AddFeedWindow();
        addFeedWindow.addCloseListener(new Window.CloseListener() {
            @Override
            public void windowClose(com.vaadin.ui.Window.CloseEvent e) {
                Feed feed = addFeedWindow.getFeed();
                if(feed != null){
                    // Save new feed and syncronize with remote feed
                    feedService.add(feed);
                    feeds.addBean(feed);
                    syncronize(feed);
                }
            }
        });
        getUI().addWindow(addFeedWindow);
    }

    @Override
    public Action[] getActions(Object target, Object sender) {
        if(target == null){
            return new Action[]{ ADD_FEED_ACTION };
        } else {
            return new Action[]{ REMOVE_FEED_ACTION, SYNCRONIZE_ACTION };
        }
    }

    @Override
    public void handleAction(Action action, Object sender, Object target) {
        if(action == ADD_FEED_ACTION){
            addFeed();
        } else if(action == REMOVE_FEED_ACTION){
            feedService.remove((Feed)target);
            feedTable.removeItem((Feed)target);
            if(feedTable.getValue() == null && feeds.size() > 0){
                feedTable.setValue(feeds.getItemIds().iterator().next());
            }
        } else if(action == SYNCRONIZE_ACTION){
            syncronize((Feed)target);
        }
    }

    private void syncronize(Feed feed){
        // Syncronize feed with remote ATOM/RSS feed
        feedService.syncronize(feed);

        if(feedTable.getValue() == feed){

            // Remove old entries
            entries.removeAllItems();

            // Add new entries
            entries.addAll(feed.getEntries());
        }
    }

    /* Some methods were removed to keep the example short */
}
There is nothing really special in this class for Vaadin developers. Instead of an application we now create an UI with almost the same init() method as in the application. We define our user interface components and bind the datasources together using containers. This is pretty basic Vaadin programming so I won't delve into it any further. If you feel confused you should check out the documentation at https://vaadin.com/learn.
What is noteworthy here is that we are only using our service layer to add and fetch our feeds from which means we are free to change the data layer at any time without affecting the UI.
Putting it all together and running the project
It is time to wrap this article up. We now have all the pieces need to run our application.
Running ./gradlew build will produce all our artifacts which we are going to need. The artifacts which we are going to get from our projects are two jar archives and one war archive which we can deploy to any application server. If nothing has changed in an subproject then the artifact will NOT be rebuilt, which means you are going to save some time when building. The build will also automatically run any unit tests available before creating the artifacts which guarantees we get valid builds.
So running the build will produce the following artifacts:
feedreader/data/build/libs/data-0.0.1.jar (data layer)
feedreader/service/build/libs/service-0.0.1.jar (service layer)
feedreader/frontend/build/libs/frontend-0.0.1.war (frontend application)
You can now take that WAR archive (which actually will include the data and service jars) and drop it in any application server. Simple? Indeed!
But we also have an alternative way of quickly testing our application. Gradle comes with a embedded Jetty server we can use and if you were observant you'll notice that we added the jetty plugin to our frontend build script for easy testing. To use that server we only need to type ./gradlew jettyRun and the application will automatically be built, tested and deployed to the jetty server and the server automatically started. The only thing you need to do after that is point your browser at the provided URL and everything just works.
And here is a picture of the final application running on my computer: