Continuous Integration with Gitosis and Jenkins
This is a continuation from a previous blog post I made about Git and Gitosis. You should check it out for background information about my setup. So now that we have a working git server up and running lets take a look how we could setup a Continuous Integration (CI) server to provide us with nightly builds.
There are many opensource servers available for this purpose, and my choice finally settled on Jenkins since it looked the most easily approachable of the bunch. Jenkins, previously known as Hudson, is a Java server based CI-system running in a servlet-container. It has a nice clean web interface written in Jelly (http://commons.apache.org/jelly) which is quite easy to use even though it is not as flashy as some other frameworks like wicket or vaadin.
Installation
To get started using Jenkins we will need to first install a Java servlet container. I am going to use Apache Tomcat 6. And for reference I am going to install this on the same server which is hosting my git server which is running Fedora 15 as I write this. So all instructions will be for Fedora but they can most likely easily be translated to the *nixes as well.
Now, to install Tomcat 6 on Fedora 15 I am going to use yum so I open a console and do:
$ yum install tomcat6 tomcat6-admin-webapps tomcat6-webapps
This will install and setup Tomcat 6 on your server. Now you should try to start it.
$ su -c "service tomcat6 start"
If all goes well the server should be listening on http://localhost:8080. For me there was some permission problems so I had to do
$ chmod g+x /usr/share/tomcat6/logs
$ chmod g+x /etc/tomcat6
$ chmod g+x /usr/share/tomcat6/webapps/
$ chmod g+x /usr/share/tomcat6/temp
$ chmod g+x /usr/share/tomcat6/work
$ chmod g+x /var/cache/tomcat6
$ chown -R tomcat:tomcat /etc/tomcat6/Catalina
$ chmod g+x /var/lib/tomcat6/
$ service tomcat6 restart
That resolved it for me. Onward!
Now lets install Jenkins. Installing Jenkins is rather easy, you can either use their prebuilt system packages or you can just download the Jenkins WAR and drop it in the tomcat webapp folder. I decided to do the latter. To do what I did, start by downloading the latest and greatest war from the Jenkins site (http://jenkins-ci.org/) and put it in your tomcat webapps folder. On my fedora system the folder was /var/lib/tomcat6/webapps/
Wait a second for tomcat to notice that there was a new application added to the container and navigate to http://localhost:8080/jenkins where you should see Jenkins start up. That is it for the installation.
Setup Jenkins with Gitosis
Remeber how Gitosis authenicates the users using ssh keys? For Jenkins to be able to checkout our projects from Gitosis we will need to first and foremost create a SSH key for the user who is running the tomcat container where Jenkins is served. In my case this is the tomcat user. To do this we need to create the private and public keys for the tomcat user. To do this I create the keys in the .ssh folder of the tomcat user.
$ su -s /bin/sh tomcat
$ mkdir /usr/share/tomcat6/.ssh
$ cd /usr/share/tomcat6/.ssh
$ ssh-keygen -t rsa
That will create the appropriate keys. Now we need to add the public key of the tomcat user to Gitosis. To recap, gitosis keeps all configuration settings in a git repository so to add the tomcat key we just need to add it to the keydir-folder in that repository. I had in the previous blog post checked out this repository as the administrative user on my gitosis server, so I just copy the public key into the repository and push it to the server.
$ cp /usr/share/tomcat6/.ssh/id_rsa.pub /home/git/gitosis-admin/keydir/tomcat@localhost.pub
$ cd /home/git/gitosis-admin
$ git add keydir/tomcat@localhost.pub
Next we need to add the tomcat user to the repos we want to use in Jenkins. This is done in the gitosis.conf file. So add the tomcat@locahost user to repos you want to use in Jenkins, in this case the test repo, and close the file. If you don't rember how this was done check the previous post. Now we are ready to commit the changes to the server.
$ git commit -am "Added tomcat user key and added tomcat user to repositories"
$ git push
Done. Now if all went well Jenkins should be able to access our git repositories.
Setup a project with Jenkins
Remember how we set up a test project in Gitosis in the last article? Now lets see how we can get that project into Jenkins.
Start by pointing your browser to the Jenkins web interface. When it is up and loaded it should look something like this:
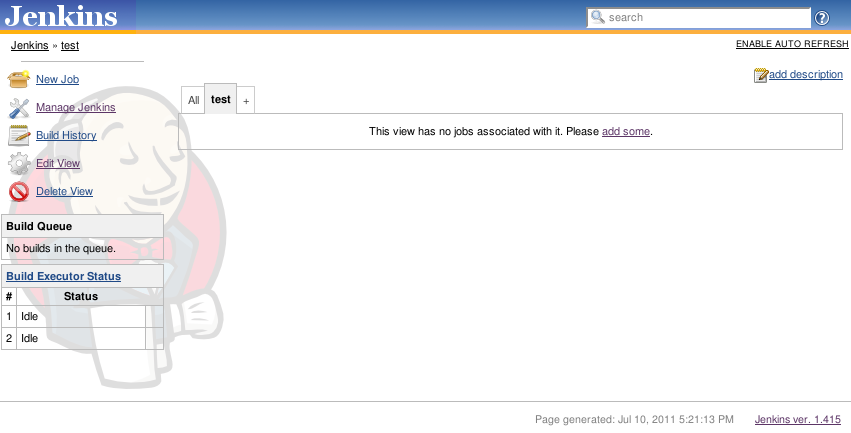
The fresh install will look a bit different since you will not have the test tab I already had created, there will just be the All tab visible.
Now, to add a new project select the New Job link in the left panel. When you click that Jenkins will ask you for a name and type of project. Since we are adding our test project set the name as Test and type as "Build a free-style software project". Then click OK.
After the project is created its properties will be displayed. There are lots of different things you can tweak with the project but since this blog post is about integrating Gitosis with Jenkins I am just going to show you how you get the files visible in the Test job.
So, the thing we are interested in is the section called Source Code Management. By default it will have four options; CVS, Git, None and Subversion. By default None will be selected. Of course we want to use Git so select that and the section will change to look like this:
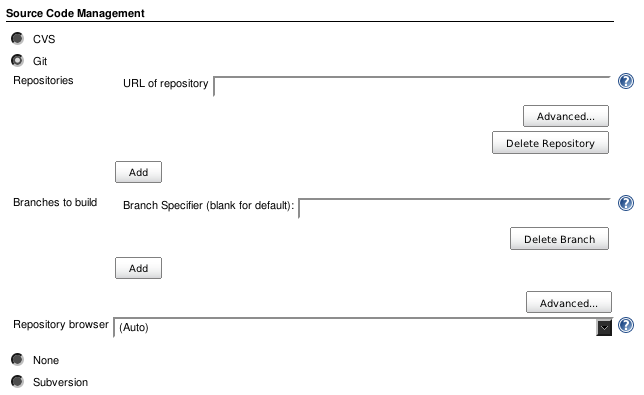
There are three things we need to fill out; the repository url, the branch and the repository browser. Lets start with the Url.
Now, since Jenkins is on the same server as Gitosis we can use the localhost address to access it, if you have them on separate servers then you will need to exchange localhost to the servers hostname. So, for me the Url becomes
URL of repository: git@localhost:test
Next up the branches. We only have one branch, and that is the master branch so we set the branch to the master branch.
Branch Specifier: master
And finally lets set the repository browser. The options you have by default is githubweb, gitweb and redmineweb. In the previous article we set up gitweb so lets use that one. When you select it you will also need to provide the URL to the gitweb server. Here is my settings:
Repository browser:    	gitweb
URL:                   	http://localhost/git?p=test.git
Okay, now scroll down and click Save. Now you have the test project incorporated in Jenkins and you will be returned to your project main page.

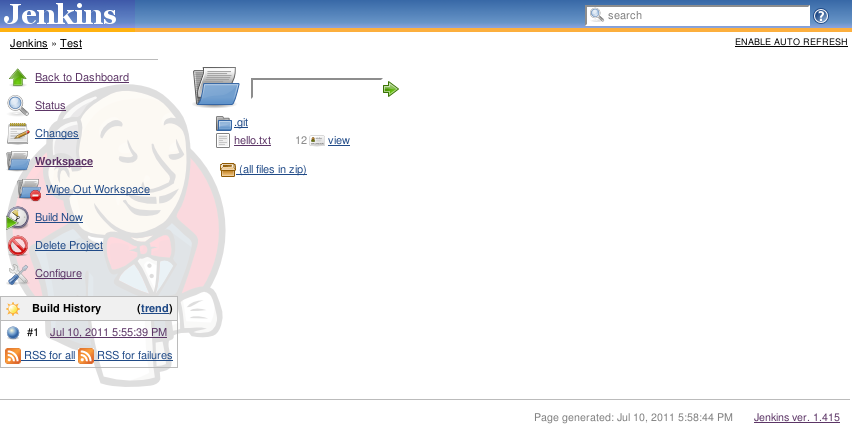
Now, to try it out click the Build Now button which will trigger Jenkins to make a build for you. When you see the build in the Build History click on the Workspace link and you should be able to browse your git repository from within Jenkins.
Finally, if you click on the build in the Build History then you will get specific details about that build. For instance the console output from the build, change history and a lot more. Check it out.
That is it for this tutorial. Now that you have your projects in Jenkins you can start tweaking them to automatically build release packages, run unit tests and generate code coverage reports. Jenkins plugin repository is gigantic and I am pretty sure you will find all tools you need to get going. Maybe I'll create a blog post about those in the future, I don't know :)